Before we get into managing disks in Windows 7, let's review file systems first. A file system is a method of storing and organizing computer files and their data. There are two types of file systems supported by Windows as follows:
FAT File System - File Allocation Table (FAT) is a file system that was created by Microsoft in 1977. FAT is still in use today as the preferred file system for floppy drive media and portable, high capacity storage devices. FAT is the most simple of the file systems supported by Windows. It is characterized by the file allocation table (FAT), which is a table that resides at the very "top" of the volume. To protect the volume, two copies of the FAT are kept in case one becomes damaged. In addition, the FAT tables and the root directory must be stored in a fixed location so that the system's boot files can be correctly located.
There is no organization to the FAT directory structure, and files are given the first open location on the drive. In addition, FAT supports only read-only, hidden, system, and archive file attributes. There are three versions of the FAT file system.
FAT12 - This initial version of the FAT file system was introduced in 1977, even before MS-DOS, and was the primary file system for Microsoft operating systems up to MS-DOS 4.0. FAT12 supports drive sizes up to 32MB.
FAT16 - The second implementation of FAT was FAT16, introduced in 1988. FAT16 was the primary file system for MS-DOS 4.0 up to Windows 95. FAT16 supports drive sizes up to 2GB.
FAT32 - FAT32 is the latest version of the FAT file system. It was introduced in 1996 for Windows 95 OSR2 users and was the primary file system for consumer Windows versions through Windows ME. FAT32 supports drive sizes up to 8TB.
NTFS File System - The New Technology File system (NTFS) was introduced by Microsoft in 1993 with Windows NT 3.1. NTFS supports hard drive size up to 256TB. NTFS is the primary file system used in Microsoft's Windows 7, Windows Vista, Windows XP, Windows 2000, and Windows NT Operating Systems. The goals of NTFS are to provide:
Reliability, which is especially desirable for high end systems and file servers
A platform for added functionality
Support for POSIX requirements
Removal of the limitations of the FAT and HPFS file systems
To ensure reliability of NTFS, three major areas were addressed: recoverability, removal of fatal single sector failures, and hot fixing.
NTFS is a recoverable file system because it keeps track of transactions against the file system. When a CHKDSK is performed on FAT or HPFS, the consistency of pointers within the directory, allocation, and file tables is checked. In NTFS, a log of transactions against these components is maintained so that CHKDSK need only roll back transactions to the last commit point in order to recover consistency within the file system.
In FAT or HPFS, if a sector that is the location of one of the file system's special objects fails, then a single sector failure will occur. NTFS avoids this in two ways: first, by not using special objects on the disk and tracking and protecting all objects that are on the disk. Second, NTFS keeps multiple copies (the number depends on the volume size) of the Master File Table.
Some features that are available when you choose NTFS:
File encryption allows you to protect files and folders from unauthorized access.
Permissions can be set on individual files, as well as on folders.
Disk quotas allow you to monitor and control the amount of disk space used by individual users.
Better scalability allows you to use large volumes. The maximum volume size for NTFS is much greater than it is for FAT.
Additionally, NTFS performance does not degrade as volume size increases, as it does in FAT systems.
Recovery logging of disk activities helps restore information quickly in the event of power failure or other system problems.
Windows supports the FAT16, FAT32, and NTFS file systems. Because NTFS has all the basic capabilities of FAT16 and FAT32, with the added advantage of advanced storage features such as compression, improved security, and larger partitions and file sizes, it is the recommended file system for Windows 7. The table below compares some additional NTFS and FAT32 capabilities.
Comparison Issues
NTFS
FAT32
Operating system compatibility
A computer running Windows Vista, Windows Server 2003, Windows 2000, or Windows XP can access files on an NTFS partition. A computer running Windows NT 4.0 with Service Pack 4 or later can access files on the partition, but some NTFS features, such as Disk Quotas, are not available. Other operating systems allow no access.
File access is available only to computers running Microsoft Operating Systems.
Volume size
Volumes up to 2 terabytes, but support for much larger sizes is possible.
Supports volumes from 512 MB to 2 terabytes. Cannot be used on floppy disks.
File size
Maximum file size is 2 terabytes.
Volumes from 512 MB to 2 terabytes.
Files per volume
4,294,967,295 (232 minus 1 files)
Approximately 4,177,920
MBR vs GPT:
When you prepare any drive or volume to be used by Windows 7, you must first partition and then format the disk. Partitioning is defining and dividing the physical or virtual disk into logical volumes called partitions. Each partition functions as if it were a separate disk drive. Windows 7 supports two types of disk partitioning - Master Boot Record (MBR) and GUID partition table (GPT).
Master Boot Record (MBR) is the standard partitioning scheme thats been used on hard disks since the PC first came out. It supports 4 primary partitions per hard drive, and a maximum partition size of 2TB.
GUID Partition Table (GPT) disks are a newer partitioning type that was introduced with Intel Itanium-based processors and the Extensible Firmware Interface (EFI). EFI is used instead of the BIOS as the interface between the computers hardware devices, its firmware, and the operating system as found with MBR. A GPT disk can support a volume up to 2^64 blocks in length. For 512-byte blocks, this is 9.44 ZB zettabytes. 1 ZB is 1 billion terabytes. It can also support theoretically unlimited partitions. Windows restricts these limits further to 256 TB for a single partition (NTFS limit), and 128 partitions. When using a drive over 2 TB, you must use GPT. The GPT partitioning style cannot be used on removable media.
Instructions for converting between these partition type are provided in the Disk Management Tool section below.
Basic Disks vs Dynamic Disks:
Basic disks and dynamic disks are two types of hard disk configurations in Windows. Most personal computers are configured as basic disks, which are the simplest to manage. Advanced users and IT professionals can make use of dynamic disks, which use multiple hard disks within a computer to manage data, usually for increased performance or reliability.
A basic disk uses primary partitions, extended partitions, and logical drives to organize data. A formatted partition is also called a volume (the terms volume and partition are often used interchangeably). In this version of Windows, basic disks can have either four primary partitions or three primary and one extended partition. The extended partition can contain multiple logical drives (up to 128 logical drives are supported). The partitions on a basic disk cannot share or split data with other partitions. Each partition on a basic disk is a separate entity on the disk.
Dynamic disks can contain a large number of dynamic volumes (approximately 2000) that function like the primary partitions used on basic disks. In Windows 7, you can combine separate dynamic hard disks into a single dynamic volume (called spanning), split data among several hard disks (called striping) for increased performance (no fault tolerance), or duplicate the data on one disk to another (called mirroring).
Let's take a look at these configurations in a little more detail.
Spanned volumes - A spanned volume is a formatted partition which data is stored on more than one hard disk, yet appears as one volume. Spanned volumes are a non-RAID drive architecture. If you extend a simple volume to another dynamic disk, it automatically becomes a spanned volume. You can extend a simple volume to make it a spanned volume, and you can also further extend a spanned volume to add disk storage capacity to the volume. After a volume is spanned, you cannot stripe or mirror it.
Striped volumes - Striped volumes are dynamic volumes that contain disk space from two to thirty-two hard disks. Data that is written to a striped volume is divided by the operating system into chunks of 64KB. The operating system stores each chunk on a separate disk. Since, in a striped volume, a large amount of data is divided into identical portions, it is faster to read or write the data from a striped volume than from a spanned volume. Striped volumes are not fault tolerant and are also referred to as RAID-0. A striped volumes capacity is limited to the space available on the disk with the smallest amount of available space.
Mirrored volumes - A mirrored volume, also known as RAID-1, is a fault-tolerant volume that duplicates data on two different physical disks. If one of the disks fails, the data is not lost as an exact copy remains on the surviving disk. Mirroring costs disk space - for example, if you mirror two 100 GB disks, you are left with just 100GB of space rather than 200GB. While great for redundancy, mirroring isn't ideal for performance as all data has to be written twice.
While Windows 7 only supports RAID levels 0 and 1 via software, a 3rd party solution can provide additional RAID services such as RAID-5. For more information about RAID, read Hardware and Software RAID.
Note: Dynamic disks are supported only on computers that use the Integrated Drive Electronics (IDE), Small Computer System Interface (SCSI), Fibre Channel, or Serial Storage Architecture (SSA). Laptops and other mobile devices, removable disks, and disks connected via Universal Serial Bus (USB) or FireWire (IEEE 1394) interfaces are not supported for dynamic storage. Dynamic disks are also not supported on hard drives with a sector size less than 512 bytes and the disk must have at least 1mb of free space for the dynamic disk database.
Disk Management Tool:
Disk Management is a useful built-in Windows 7 partition manager that makes hard disk partitioning quick and simple. Windows 7 Disk Management includes:
A built-in partition manager
A graphical user interface (GUI)
Ability to create new disk partitions within Windows 7
Ability to shrink existing disk partitions
With Disk Management, you can initialize disks, create volumes, format volumes with file systems FAT, exFAT,
FAT32 or NTFS. You can also extend a disk, reduce a disk, check if a disk is healthy or unhealthy, create partitions, delete partitions, or change a drive letter. Disk Management enables you to perform most disk-related tasks without
restarting the system, and most changes take effect immediately. To access Disk management, perform these steps:
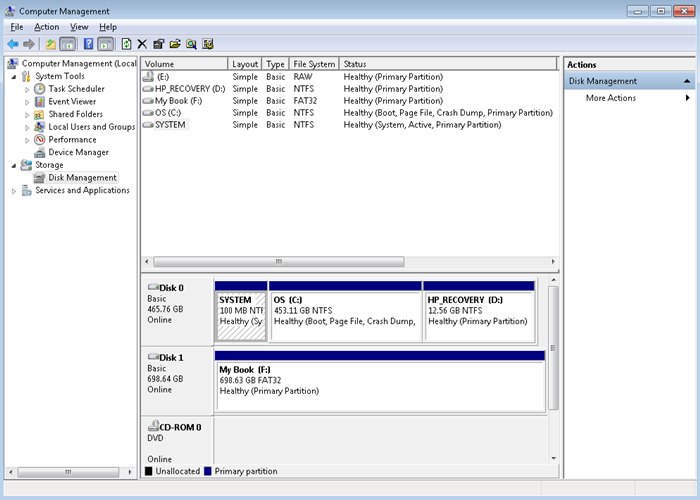
Click Start, right-click Computer, and click Manage.
In the left pane click Disk Management.
The Disk Management console shown above lists each volume in alphabetical order. Each hard disk is then broken down into Type, File System, Status, Capacity, and Free Space. In the second horizontal column, each logical drive is labeled by its letter and given a color. Right-clicking on each drive opens a menu where users can extend volumes, shrink volumes, or create new logical drive. You need Administrator or Backup Operator credentials to perform most Disk Management tasks.
Configuring Disks:
Follow the steps below to create a new partition in Windows 7:
In the Disk Management Console, right-click the unallocated space and select New Simple Volume, and click Next.
Select the size for the new volume or partition in MB.
Assign the drive letter to the new partition.
Format the partition with the appropriate file system and select the check box Perform a Quick Format. To enable compression, select the check box Enable File and Folder compression.
Click Finish.
Perform these steps to shrink an existing partition in order to create a new partition:
In the Disk Management Console, right-click on the partition which you want to resize. The system displays the capacity of the drive and the option to enter an amount you'd like to shrink your partition by. Click Shrink.
You can now see the unallocated space on your hard drive in the capacity you specified, situated just after your now resized original partition.
Right-click the unallocated volume, select New Simple Volume, assign a drive letter, and quick format the volume using the NTFS file system and default allocation unit size.
Extending a partition:
In the Disk Management Console, right-click the partition that you want to extend and select Extend Volume.
Click Next. The system displays the capacity of the drive and the option to enter an amount you'd like to extend your partition by. Click Next.
Click Finish.
Deleting a partition:
In the Disk Management Console, right-click the partition that you want to delete and select Delete Volume.
Click Yes to continue the deletion process.
Click Yes to delete the partition.
Changing the drive letter:
In the Disk Management Console, right-click on a partition and select Change drive letters and paths.
The current drive letter will display. The Add button typically allows the partition to be placed inside an existing NTFS folder.
Click Change to assign a new drive letter.
To convert from an MBR partition to a GPT partition, or vice versa, follow these steps:
Back up or move the data on the basic MBR disk you want to convert.
Open Computer Management (Local).
In the console tree, click Computer Management (Local), click Storage, and then click Disk Management.
The disk must not contain any partitions or volumes. If these exist, right-click any volumes on the disk and then click Delete Partition or Delete Volume.
Right-click the MBR disk that you want to change into a GPT disk, and then click Convert to GPT Disk.
Converting a basic disk to a dynamic disk:
In the Disk Management Console, simply right-click the disk you want to convert and click Convert To Dynamic Disk. If you want to convert from a dynamic disk to a basic disk, you must first delete all volumes, hence all data, on the disk.
Windows 7 will disallow any of the changes listed above if the partition is currently used as a system, boot, or page file drive.
In addition to the Disk Management Console, Windows also includes a command line utility called DiskPart that can be used to configure disks. For more information, read A Description of the Diskpart Command-Line Utility.
Disk Maintenance:
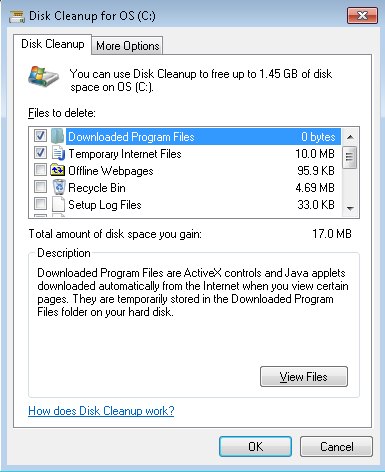
Windows provides a number of tools that can help keep your disks healthy and optimized. Let's start with Disk Cleanup. If you want to reduce the number of unnecessary files on your hard disk to free up disk space and help your computer run faster, use Disk Cleanup. It removes temporary files, empties the Recycle Bin, and removes a variety of system files and other items that you no longer need. Follow these steps:
Open Computer, right click on the drive you wish to clean and select Properties.
Click the Disk Cleanup button on the General tab and Windows will calculate how much space it can free up.
Select the items from the list that you wish to delete and click OK.
When asked "Are you sure you want to permanently delete these files, click Delete Files.
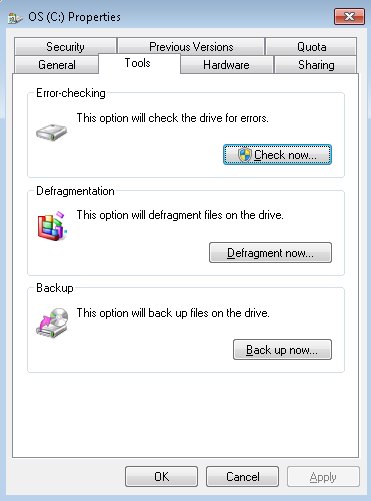
As you use your hard drive, it can develop bad sectors. Bad sectors slow down hard disk performance and sometimes make data writing (such as file saving) difficult or even impossible. The Error Checking utility scans the hard drive for bad sectors and scans for file system errors to see whether certain files or folders are misplaced. To scan a disk, follow these steps:
Open Computer, right click on the drive you wish to check and select Properties.
Click the Tools tab and then click the Check Now button.
Click Start to begin checking the drive.
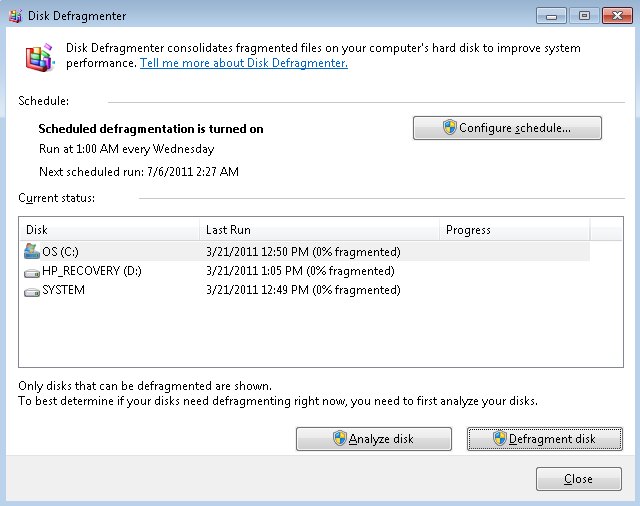
Fragmentation makes your hard disk do extra work that can slow down your computer. Removable storage devices such as USB flash drives can also become fragmented. Disk Defragmenter rearranges fragmented data so your disks and drives can work more efficiently. Disk Defragmenter runs on a schedule, but you can also analyze and defragment your disks and drives manually. To do this, follow these steps:
Open Computer, right click on the drive you wish to check and select Properties.
Click the Tools tab and then click the Defragment Now button.
On the screen shown above, click on Analyze disk button to check the drive for fragmentation.
If the drive needs to be defragmented, click the Defragment disk button. This process can take a long time.
In most cases, manual defragmentation won't need to be done because, by default, this process is scheduled to run every week. By clicking on the Configure schedule button on the screen shown above, you can change the interval and select which drives you want automatically defragmented.
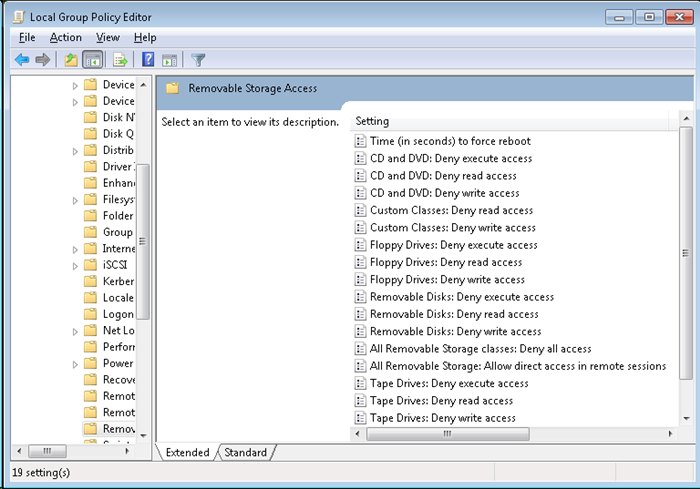
Removable Storage Access Policies:
Removable media can also pose a security threat as it can be lost or stolen, and some administrators may need to lock down client computers' ability to read, write, or execute files on such media. Local and group policy provide a method to prevent or limit users' abilities to interact with removable media. On a stand-alone client computer, you can do this through Local Group Policy Editor. In an enterprise, you would edit domain Group Policy at a domain controller and apply it to all clients in the domain.
To modify these settings in local policy, follow these steps:
Click Start then type group policy into the search box.
Click Edit Group Policy to open the Local Group Policy Editor.
Browse to Computer Configuration/Administrative Templates/System/Removable Storage Access.
Here you can double click on a policy to edit it. These are pretty self-explanatory so we won't go into them here.
Note: The WPD devices policies refer to cell phones, media players, Windows CE devices, etc.