Note that some objectives for this section were covered in the previous one and will not be discussed again here.
System Restore:
Windows 7's System Protection utility creates system restore points automatically every week, and just before significant system events, such as the installation of a program or device driver. You can also create a restore point manually. A restore point contains information about registry settings and other system information, but does not include user files. System Protection is enabled by default and is only available on NTFS drives.
If you have recently installed an application or driver that causes problems, you should try uninstalling the program or rolling back the driver. If this does not fix the problem, then you should try restoring the computer to its last system restore point.
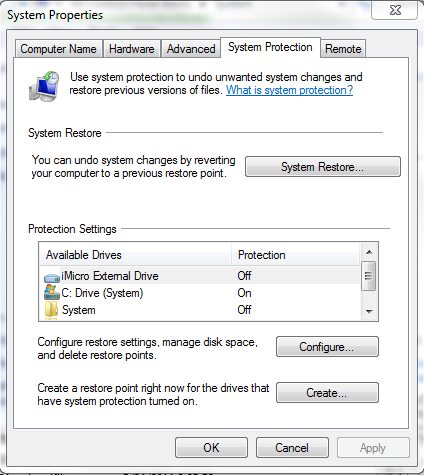
There are a couple of different ways to access the system restore utility. You can manage System Protection and the restore points from the System Protection tab of the System Properties dialog box.
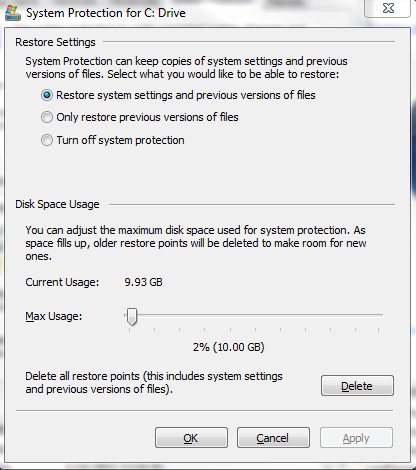
Here, you can click the System Restore button to launch the system restore wizard that allows you to reset Windows to a previous restore point. This tab also allows you to configure system restore options by clicking selecting the appropriate drive and clicking the configure button.
The System Protection tab of the system properties dialog box also allows you to manually create a new restore point. Select the appropriate drive and click the Create button. Next, enter a description for the new restore point and click Create. A dialog box appears stating that the restore point was created. Click Close.
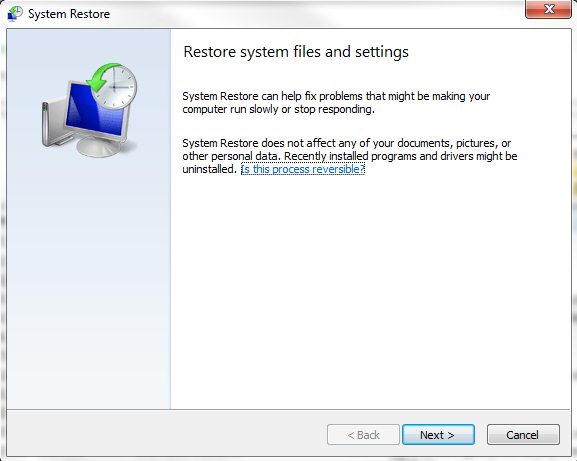
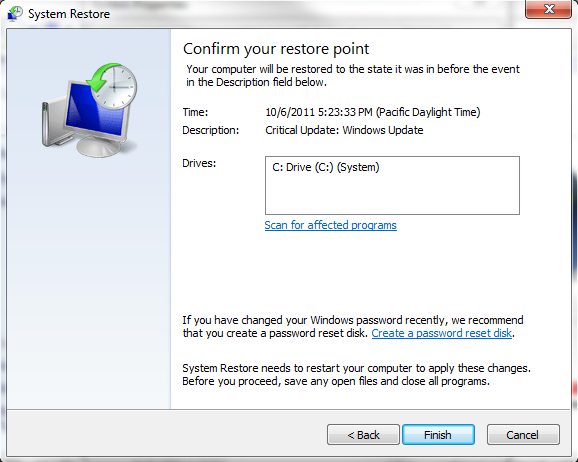
To restore your system from a restore point, you will need to access the System Restore Wizard. You can do this from the System Protection tab discussed above, or by directly by typing System Restore into the Windows 7 search box, and selecting System Restore. You can also access system restore by clicking the Recovery icon in the Control Panel and then clicking the Open System Restore button to launch the wizard.
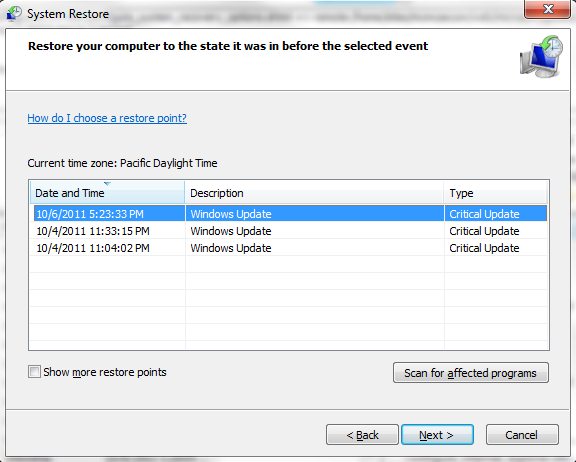
At the screen above, click Next, then select the restore point you would like to return Windows to and click Next.
Click Finish to complete the restore.
Every time you use System Restore, a restore point is created before proceeding, so you can undo the changes if they don't fix your problem. If you use System Restore when the computer is in safe mode or using the System Recovery Options, you cannot undo the restore operation. However, you can run System Restore again and choose a different restore point, if one exists.
Advanced Recovery Methods:
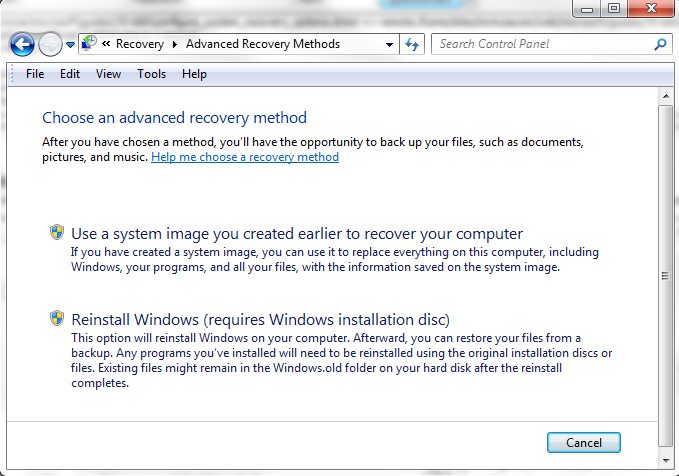
If a Windows system is badly damage and cannot be fixed by backup or system restore, you may wish to try advanced recovery methods. To access this, go to the Recovery control panel. Click on the Advanced recovery methods link.
Here you have the option to recover the system using a previously created system image (AKA "Complete PC Restore"), or to reinstall Windows. Both of these options may result in the loss of personal files, so it is important to back these up to another drive first if possible. If you select Use a system image you created earlier to recover your computer, you will first be prompted to backup your files. After that, you will be prompted to restart the computer. From here, you will want to follow the instructions for accessing System Recovery Options in the previous section. Once the System Recovery Options are loaded, select System Image Recovery and follow the instructions.
Advanced Boot Options:
In previous sections, we have briefly discussed the Advanced Boot Options menu by pressing F8 during startup. Specifically, we have discussed the "Repair your computer" option, however, there are a number of other features that can be accessed from this menu:
Safe mode - Starts Windows with a minimal set of drivers and services.
Safe mode with networking - Starts Windows in safe mode and includes the network drivers and services needed to access the Internet or other computers on your
Safe mode with command prompt - Starts Windows in safe mode with a command prompt window instead of the usual Windows interface. This option is intended for IT professionals and administrators.
Enable boot logging - Creates a file, ntbtlog.txt, that lists all the drivers that are installed during startup and that might be useful for advanced troubleshooting.
Enable low resolution video (640 × 480) - Starts Windows using your current video driver and using low resolution and refresh rate settings. You can use this mode to reset your display settings.
Last Known Good Configuration (advanced) - Starts Windows with the last registry and driver configuration that worked successfully. For example, if a newly installed driver is causing problems, or an incorrect registry setting is preventing Windows from starting correctly, you can restart your computer using Last Known Good Configuration.
Debugging mode - Starts Windows in an advanced troubleshooting mode. Boots Windows while sending debug information through a serial port to another computer. It's useful in the case of a persistent "blue screen" or "stop" error.
Disable automatic restart on system failure - Prevents Windows from automatically restarting if an error causes Windows to fail. Choose this option only if Windows is stuck in a loop where Windows fails, attempts to restart, and fails again repeatedly.
Disable Driver Signature Enforcement - Allows drivers containing improper signatures to be installed.
Start Windows normally - Starts Windows in its normal mode.
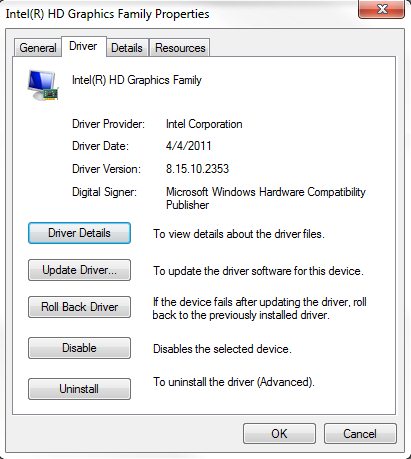
Driver Roll Back:
In most cases, when a newly installed driver causes problems, you would correct the problem using the Last Known Good Configuration boot option, or restoring to the last working system restore point. In some rare cases, such as when a new driver was packaged with essential Windows updates, you may wish to roll back the driver. This would allow you to correct the problem while keeping the other installed updates, for example. To roll back a driver, access the properties for the device, and click on the Driver tab. Click on the Driver Roll Back button to revert to the previous version. Note that this button will only appear if the driver was updated at some point.