The Remote Desktop (RDP) utility allows you to connect to a computer on a network and access all of your programs, files, and network resources as if you were sitting in front of that computer. Remote desktop is often used by security professionals to administer servers, and fix problems on client computers without having to be in front of them. In fact, they could be in another country.
You cannot use Remote Desktop Connection to connect to computers running Windows 7 Starter, Windows 7 Home Basic, and Windows 7 Home Premium. In other words, only Windows 7 Professional, Ultimate, and Enterprise editions allow a computer to connect to them via RDP. All versions of Windows 7 have the Remote Desktop client software that allows them to make outgoing connections.
To use Remote Desktop and Remote Assistance, you have to use TCP port 3389. Therefore, it needs to be opened using the Windows Firewall and any other firewalls between your computer and the remote host. Additional requirements include:
You must have permission to connect to the remote computer.
The remote computer must be turned on or have Wake on LAN enabled.
Both computers must be connected to a network.
The remote computer must be configured to accept incoming connections (see next section). By default this is turned off.
Enabling Remote Desktop Connections:
Follow these steps to enable the remote desktop connection in Windows 7:
Click Start, then right-click the Computer and select properties.
Click the Remote settings option in the window.
Enable Allow connections from computers running any version of Remote Desktop in the System Properties dialogue box.
Click Apply and the remote desktop connections feature will be enabled on your Windows 7 computer.
Note: When you enable Remote Desktop, Windows Firewall automatically updates rules to allow Remote Desktop connections to be made to the computer. If you reset Windows Firewall to its default settings, the firewall will no longer allow connections. Simply disable and then re-enable Remote Desktop to correct this problem.
Establishing a Remote Desktop Connection:
Click Start and then click All Programs and then click Accessories.
Click the Remote Desktop Connection option. The Remote Desktop dialogue box is displayed; specify the IP address or hostname of the remote machine to which you want to connect.
Click Connect and if the computer is running and remote connections are enabled on it, a connection will be made.
Enter the the username and password for that computer.
If a user other than yourself is logged into the remote machine, they will be presented with an alert that someone is trying to establish a remote desktop connection with the computer. They can choose to accept the connection or not.
Configuring Remote Desktop:
To configure remote access, follow these steps:
In the Control Panel, first click System And Security, and then click System.
Click Remote Settings in the left pane and the System Properties dialog box to the Remote tab opens.
If you want to disable the Remote Desktop, select Dont Allow Connections To This Computer, then click OK and skip the remaining steps.
To enable Remote Desktop, choose either of the two options:
Select Allow Connections From Computers Running Any Version Of Remote Desktop. This allows connections from any version of Windows.
Select Allow Connections Only From Computers Running Remote Desktop With Network Level Authentication. This allows connections only from Windows 7 or later computers and computers with secure network authentication.
Click Select Users to open the Remote Desktop Users dialog box. To grant Remote Desktop access to any user, click Add. This opens the Select Users dialog box. In the Select Users dialog box, click Locations to select the computer or domain in which the users are located with whom you want to work. Type the name of a user and enter the object names to the selected fields, and then click Check Names. If matches are found, then you can select the account you want to use and then click OK. If no matches are found, update the name you entered and search again.
To revoke remote access permissions for any user account, select the account and then click Remove.
Click OK when you have finished.
Remote Assistance:
Since Windows XP, Remote Assistance has provided a handy way to get or give a helping hand from a distance. The main difference between Remote Desktop and Remote Assistance is that with Remote Assistance, the remote user must request a connection, and when connected, both the local user and the remote user can see what is happening on the screen at the same time. Windows Remote Assistance is enabled by default on computers running Windows 7.
In previous versions of Windows, the primary way to initiate a Remote Assistance connection was by creating an "invitation" file with info on how to find and connect to your system, and sending it the person you are requesting help from via e-mail. You can still use invitation files in Windows 7, and if your helper is running Vista or XP, you'll have to. However, if both parties have Windows 7, a new feature called Easy Connect can simplify the connection process by eliminating e-mail as a middleman.
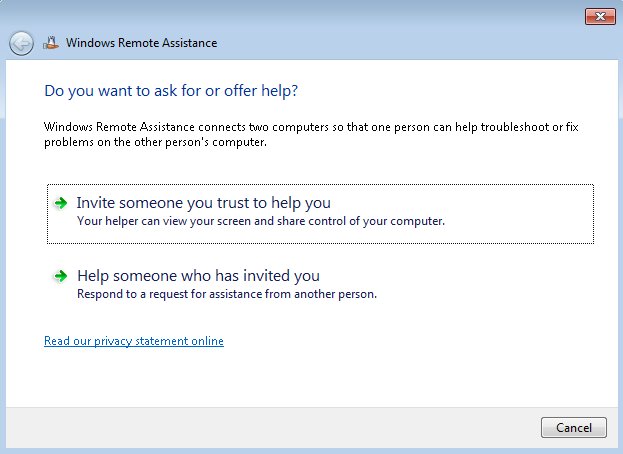
To request remote assistance in Windows 7, search for assistance from the Start menu, then click Windows Remote Assistance.
After you click Invite someone you trust to help you, you'll see Easy Connect along with the two e-mail-based invitation options. Choose Easy Connect, and then you should see a Windows Remote Assistance window displaying the 12-character password needed for access to your computer. This automatic password generation is another new Windows 7 feature, and it occurs whether you use Easy Connect or invitations. It forces you to use a strong password to increase security over that in Vista or XP.
If Easy Connect is grayed out, one of the following reasons may be the cause.
Both computers aren't running Windows 7. In order to use Easy Connect with Remote Assistance, both of the computers must be running Windows 7.
Access to the Internet is limited. If access to the Internet is limited on either computer, Easy Connect is disabled. Internet access might be limited if youre on a corporate network.
Your router doesn't support Easy Connect. Easy Connect uses the Peer Name Resolution Protocol (PNRP) to transfer the Remote Assistance invitation over the Internet. One possible issue is that your router doesn't support UPnP, or doesn't have it enabled. You may also want to try enabling port 3540 (UDP) on your router. You can check your router by using the Internet Connectivity Evaluation Tool on the Microsoft website. If you're running Windows Server, you need to install the Peer Name Resolution Protocol.
Once connected and with the remote user's permission, you can "remote control" their computer like you would with Remote Desktop, only the user will be able to see what you are doing.
After you've successfully established a Remote Assistance session with someone via Easy Connect, connecting to that person in the future will be even easier. The next time you run Remote Assistance you'll see a list of people you've previously connected to. Select a name and the Windows Remote Assistance window will launch, and when your helper connects to you, you'll be connected without having to see or enter a password because the one from your last session is cached. This subsequent connect feature only works when the helper is using the same computer they were on initially.
Windows Remote Management Service:
The Windows Remote Management service allows you to execute commands on a remote computer, either from the command prompt using WinRS or from Windows PowerShell. Before you can use WinRS or Windows PowerShell for remote management tasks, it is necessary to configure the target computer using the WinRM command. To configure the target computer, run the command WinRM quickconfig from a command prompt.
You can use Windows Remote Management service (WinRS) to execute command-line utilities or scripts on a remote computer. To use WinRS, open a command prompt and prefix the command that you want to run on the remote computer with the WinRS r:[RemoteComputerName] command. For example, to execute the Ipconfig command on a computer named Naomi, issue the command:
WinRS r:Naomi ipconfig
If the computer is on the local network, you can use its NetBIOS name. If the computer is on a remote network, you may need to specify its fully qualified domain name (FQDN). It is also possible to specify credentials to be used on the remote computer, for example, to run the command net accounts, which displays information about a computers password policy on a computer named Naomi.7-seconds.pdxoffice using the NaomiS user account, issue the following command:
WinRS r:http://Naomi.7-seconds.pdxoffice u:NaomiS net accounts
If you do not specify a password using the p:password option, you are prompted to enter a password after you execute the command. You can configure WinRS options through Group Policy in the Computer Configuration\Administrative Templates\Windows Components\Windows Remote Shell node.
PowerShell:
Windows PowerShell utilities give you the ability to remotely configure and administer a Windows 7 machine. Windows PowerShell is a command-line scripting utility that allows you to remotely execute commands on a Windows 7 machine. Windows PowerShell is a command line utility that was specifically designed for system administrators to allow for remote administration. One of the advantages of Windows PowerShell is that it introduced the concept of a cmdlet. A cmdlet is a command that is built into Windows PowerShell. There are more than 100 built-in cmdlets, and you can build your own cmdlets and allow others to use them as well.
Another advantage of Windows PowerShell is that it allows you to gain access to a file system on a computer. Windows PowerShell also allows you to access the Registry, digital certificate stores, and other data stores.
The following features are new with PowerShell in Windows 7:
New cmdlets - Windows PowerShell includes over 100 new cmdlets, like Get-Hotfix, Send-MailMessage, Get-ComputerRestorePoint, New-WebServiceProxy, Debug-Process, Add-Computer, Rename-Computer, Reset-ComputerMachinePassword, and Get-Random.
Remote management - You can run commands on one computer or more computers with a single command. You can establish an interactive session with a single computer, and computers can receive remote commands from multiple computers.
PowerShell Integrated Scripting Environment (ISE) - Windows PowerShell ISE is a graphical user interface for Windows PowerShell with which you can run commands, and write, edit, run, test, and debug scripts in the same window. It offers eight independent execution environments and includes a inbuilt debugger, multiline editing, selective execution, syntax colors, line and column numbers, and context-sensitive Help.
Background jobs - With Windows PowerShell background jobs, you can run commands asynchronously in the background and can continue to work in your session. You can run background jobs on a local or remote computer, and can store the results locally or remotely.
Debugger - The Windows PowerShell debugger can help you to debug functions and scripts. You can step through code , set and remove breakpoints, check the values of variables, and display a call-stack trace.
Modules - Windows PowerShell modules allow you to organize your Windows PowerShell scripts and functions into independent, self-contained units. You can package your cmdlets, scripts, functions, and other files into modules that can be distributed to other users. Modules are easier to install and use as compared to Windows PowerShell snap-ins. Modules can include any type of file, like audio files, images, Help files, and icons. Modules run in a separate session so as to avoid name conflicts.
Transactions - Windows PowerShell now also supports transactions, through which you can manage a set of commands as a logical unit. A transaction can be committed, or it can be completely undone to undo the changes and the affected data is not changed by the transaction.
Events Windows PowerShell includes a new event infrastructure with which you can create events, subscribe to system and application events, then you can listen, forward, and act on the events synchronously and asynchronously.
The Advanced functions - Advanced functions are similar to cmdlets, but they are written in the Windows PowerShell scripting language instead of in C#.
Script internationalization - Scripts and functions display messages and Help text to users in various languages.
Using Windows PowerShell:
Click Start, then click All Programs and then click Accessories.
Click Windows PowerShell and then again click Windows PowerShell to access it. Windows PowerShell Integrated Scripting Environment (ISE) is a new host application which allows you to run commands and write, test, and debug scripts in a friendly, syntax-colored. It can be accesses by clicking Windows PowerShell ISE.
When the Windows PowerShell utility starts, type Help and press Enter. This will show you the Windows PowerShell syntax and some of the commands included with Windows PowerShell. You can type Help * at the Windows command prompt. This will show you all of the cmdlet commands that you can use.
Following are few Windows PowerShellcmdlets:
Clear-History
Deletes entries from the command history
Invoke-command
Runs commands on local or remote computers
Start-job
Starts a Windows PowerShell background job
Stop-job
Stops a Windows PowerShell background job
Remove-job
Deletes a Windows PowerShell background job
Import-Module
Adds modules to the current session
Receive-job
Gets the results of a Windows PowerShell background job
Format-table
Shows the results in a table format
Out-file
Sends the job results to a file
Get-Date
Gets the date and time
Set-Date
Sets the system time and date on a computer
Get-event
Gets an event in the event queue
New-event
Creates a new event
Trace-command
Configures and starts a trace of a command on a machine.