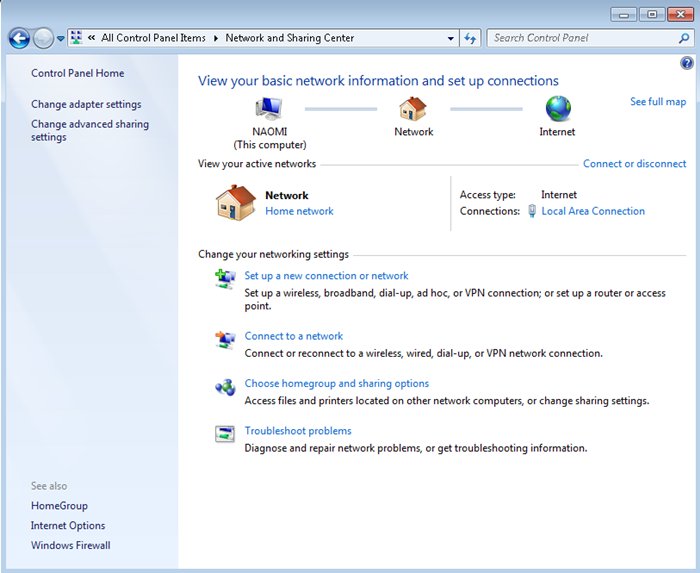
Windows 7 networking starts with the Network and Sharing Center which provides a centralized location where you can view, create, and modify local area network (LAN), wireless local area network (WLAN), virtual private network (VPN), dial-up, and Broadband connections on your client and server computers. In addition, you can configure connections to the local computer and sharing options that specify the content that is available to other computers and devices on the network; and you can use Network and Sharing Center tools like Network Map and Network Location to view and specify additional settings about networks and network profiles. It can also be used to troubleshoot network connectivity issues. The Network and Sharing center can be accessed via the control panel.
Adding a Network Connection:
If your computer has a network adapter that is connected to a local area network, you do not need to manually create a LAN connection, because Windows automatically creates and configures the connection when you start your computer. Other types of connections such as VPN and dial-up can be configured as follows:
Open the Network and Sharing Center control panel.
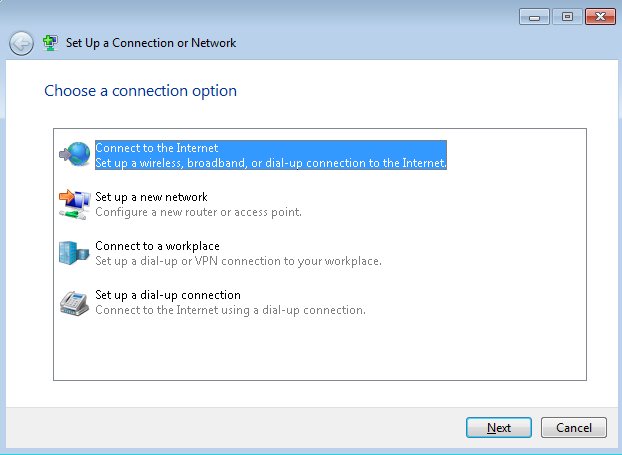
In Change your network settings, click Set up a new connection or network. The Set up a new connection or network wizard opens.
Select the type of network or connection you wish to establish and complete the rest of the wizard.
Network Locations:
The first time that you connect to a network, you must choose a network location. This automatically sets the appropriate firewall and security settings for the type of network that you connect to. If you connect to networks in different locations (for example, a network at your home, at a local coffee shop, or at work), choosing a network location can help ensure that your computer is always set to an appropriate security level.
There are four network locations:
Home Network - For home networks or when you know and trust the people and devices on the network. Computers on a home network can belong to a homegroup. Network discovery is turned on for home networks, which allows you to see other computers and devices on the network and allows other network users to see your computer. For more information, see What is network discovery?
Work Network - For small office or other workplace networks. Network discovery, which allows you to see other computers and devices on a network and allows other network users to see your computer, is on by default, but you can't create or join a homegroup.
Public Network - For networks in public places (such as internet cafes or airports). This location is designed to keep your computer from being visible to other computers around you and to help protect your computer from any malicious software on the Internet. HomeGroup is not available on public networks, and network discovery is turned off. You should also choose this option if you're connected directly to the Internet without using a router, or if you have a mobile broadband connection.
Domain Network - Used for domain networks such as those at enterprise workplaces. This type of network location is controlled by your network administrator and can't be selected or changed.
About IPv4:
Once your network connection(s) are established, it is time to configure IP settings. Every IP address can be broken down into 2 parts, the Network ID and the Host ID. All hosts on the same network must have the same netid. Each of these hosts must have a hostid that is unique in relation to the netid. IPv4 addresses are divided into 4 octets with each having a maximum value of 255. We view IPv4 addresses in decimal notation such as 124.35.62.181, but it is actually utilized as binary data.
IP addresses are divided into 3 classes as shown below:
Class
Range
A
1-126
B
<128-191
C
192-223
NOTE: 127.x.x.x is reserved for loopback testing on the local system and is not used on live systems. The following address ranges are reserved for private networks:
IPv4 has nearly run out of available IP addresses due to the large influx of internet users and expanding networks. As a result, the powers that be had to create a new addressing scheme to deal with this situation and developed IPv6. This new addressing scheme utilizes a 128 bit address (instead of 32) and utilizes a hex numbering method in order to avoid long addresses such as 132.64.34.26.64.156.143.57.1.3.7.44.122.111.201.5. The hex address format will appear in the form of 3FFE:B00:800:2::C for example. The IPv6 equivalent of IPv4's loopback address is 0:0:0:0:0:0:0:1. This can be abbreviated as ::1.
Windows 7 supports both IPv4 and IPv6 through a dual-IP-layer architecture and both are installed and enabled by default. This architecture enables you to tunnel IPv6 traffic across an IPv4 network in addition to tunneling IPv4 traffic across an IPv6 network.
Configuring IP Settings:
You can configure network settings on your Windows 7 computer either statically or dynamically. Static network settings include assigning the IP address, and other related information like gateway, DNS etc manually which enable it to become a part of a network. Dynamic settings make use of Dynamic Host Configuration Protocol (DHCP) to assign IP address and other networking information to your system automatically from a pre-set pool of addresses.
Follow these steps to configure TCP/IP settings manually on your computer:
Open Network Connections by clicking the Start button, then click Control Panel and Network and Internet inside the control panel.
Click Network and Sharing Center on your computer.
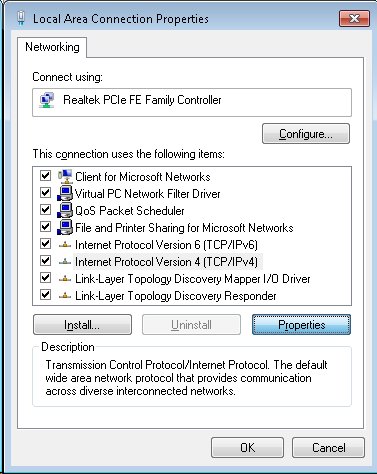
Click Local Area Connections and then click Properties to configure network addresses and other information.
Click the Networking tab and then, click either Internet Protocol Version 4 (TCP/IPv4) or Internet Protocol Version 6 (TCP/IPv6) and then click Properties.
To specify IPv4 IP address settings:
To configure IP address automatically, click Obtain an IP address automatically, and then click OK. This option will only work if there is a DHCP server on your network with available addresses to lease.
To specify an IP address manually, click Use the following IP address, and then, in the IP address, Subnet mask, and Default gateway boxes, type the IP address settings.
To specify DNS server address settings:
To get the DNS server address automatically, click Obtain DNS server address automatically, then click the Advanced button. Select the WINS tab. Under NetBIOS setting, select the Default and then click OK.
To specify a DNS server address manually, click Use the following DNS server addresses radio button, and then, for the Preferred DNS server and Alternate DNS server, type the addresses of the primary and secondary DNS servers.
Click OK. This will make the appropriate changes in the TCP/IP configuration of tour computer.
Note: If you wish to configure IPv6 to obtain an IP address (and other settings) automatically, your network must have a DHCPv6 capable DHCP server.
A Windows 7 computer that is configured to use DHCP can automatically assign itself an Internet Protocol (IP) address if a DHCP server is not available. For example, this could occur on a network without a DHCP server, or on a network if a DHCP server is temporarily down for maintenance.
The Internet Assigned Numbers Authority (IANA) has reserved 169.254.0.0-169.254.255.255 for Automatic Private IP Addressing. As a result, APIPA provides an address that is guaranteed not to conflict with routable addresses.
After the network adapter has been assigned an IP address, the computer can use TCP/IP to communicate with any other computer that is connected to the same LAN and that is also configured for APIPA or has the IP address manually set to the 169.254.x.y (where x.y is the clients unique identifier) address range with a subnet mask of 255.255.0.0. Note that the computer cannot communicate with computers on other subnets, or with computers that do not use automatic private IP addressing. This also means that a computer with an APIPA address cannot connect to the internet, only other computers with APIPA addresses. Automatic private IP addressing is enabled by default.
If a DHCP enabled computer is using an IP address in the APIPA range, it often indicates that the computer is unable to contact the DHCP server.
Link-Local Multicast Name Resolution:
LLMNR is a Microsoft designed protocol that can be used on private networks where there is no DNS server, as a mechanism for providing name resolution like DNS does. It is one of many protocols that do similar things for zero-configuration networks - they basically allow private networks to function as IP networks without requiring hosts to be configured with addresses.
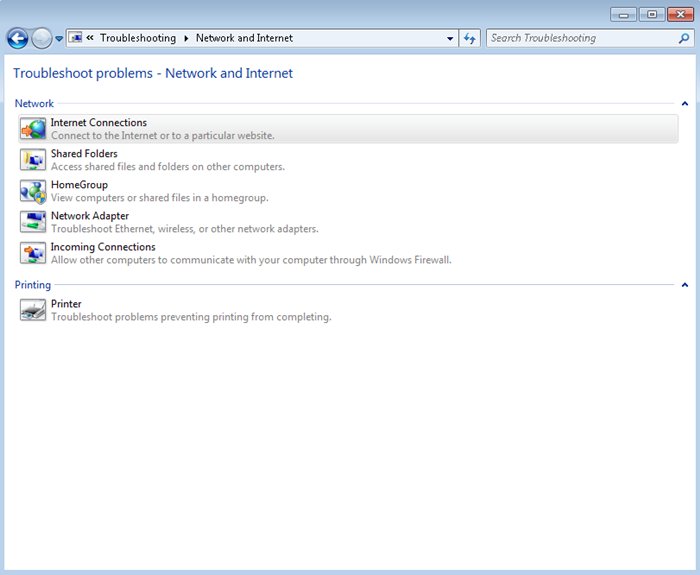
Windows offers a number of tools and utilities for troubleshooting connectivity and other network problems. A good place to start is by clicking on the Troubleshoot problems option in the Network and Sharing Center. This opens the Windows Network Diagnostics tool. If Windows 7 detects the problem, it may be able to automatically fix it, or possibly offer a solution.
If this wizard is unable to fix the problem or offer a solution, there are a number of other tools listed below that can help.
IPCONFIG - This command is used to view network settings from a Windows computer command line. Below are the ipconfig switches that can be used at a command prompt:
ipconfig /all will display all of your IP settings.
ipconfig /renew forces the DHCP server, if available to renew a lease.
ipconfig /renew6 renews n IPv6 DHCP lease.
ipconfig /flushdns purges the DNS resolver cache.
ipconfig /registerdns refreshes all DHCP leases and reregisters DNS names.
ipconfig /release forces the release of a lease.
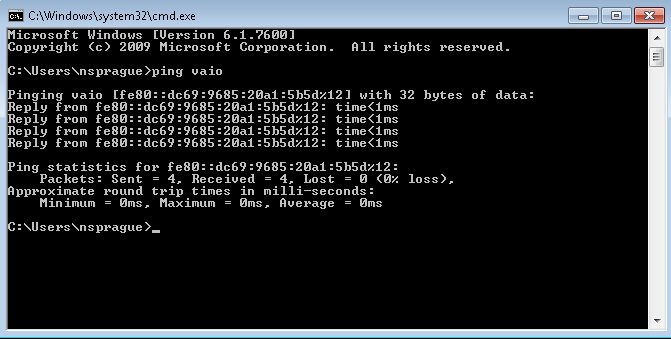
PING (Packet InterNet Groper) - PING is a command-line utility used to verify connections between networked devices. PING uses ICMP echo requests that behave similarly to SONAR pings. The standard format for the command is ping [IP address or hostname]. If successful, the ping command will return replies from the remote host with the time it took to receive the reply. If unsuccessful, you will likely recieve and error message. This is one of the most important tools for determining network connectivity between hosts.
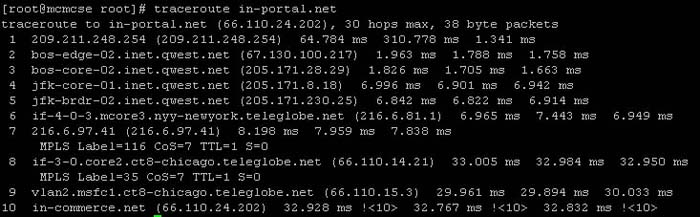
TRACERT - A command-line troubleshooting tool that enables you to view the route to a specified host. This will show how many hops the packets have to travel and how long it takes. Basic usage looks like: tracert [IP address or hostname].
PATHPING - This tool is very similar to tracert, however, pathping provides more detailed statistics on individual hops.
ARP (Address Resolution Protocol) - A host PC must have the MAC and IP addresses of a remote host in order to send data to that remote host, and it's ARP that allows the local host to request the remost host to send the local host its MAC address through an ARP Request. The ARP -a [IP Address] command will show you the MAC address associated with a computer or device's IP address.
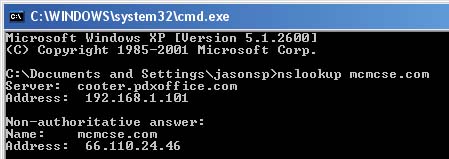
NSLOOKUP - This is a command that queries a DNS server for machine name and address information. To use nslookup, type nslookup [IP address or computer name or domain name]. NSLOOKUP will return the name, all known IP addresses and all known aliases (which are just alternate names) for the identified machine. NSLOOKUP is a useful tool for troubleshooting DNS problems.