Problematic issues and failings relating to computer systems can be varied, ranging from deletion of a few key users' files to severe catastrophic system failure where a unit is unable to bootup and load the operating system normally. There are a range of tools an administrator can put in place to assist the recovery when system problems develop. These include:
The Volume Shadow Service (VSS)
Use of Advanced Boot Menu Options
Data and\or complete system Backup
Volume Shadow Service (VSS):
Volume Shadow Service\Volume Shadow Copy is a facility that can be used to help protect data\files held in shared folders. Consider the scenario where a user browses across a LAN to a file\files held in a shared folder on a system. The user then modifies or deletes the file before realizing the modification\deletion was done in error. With VSS in place a previous version of the file could exist in a hidden folder on the same volume of the share. The user can use this hidden backup to restore the file to its original state.
Note: For shares held on Windows XP, Windows 2000, Windows NT systems additional software needs to be added before VSS is viable. On Windows 2003, Vista, 2008, 2008 R2, 2012, VSS software is built into the system.
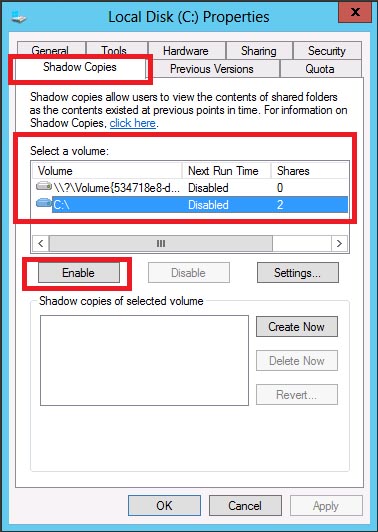
To turn on VSS for shares held on a server unit, for example, simply turn on VSS on the volume where the shares are held such as the C: drive in the figure below. To get to this window, simply right click on the drive, select "properties", and click on the "Shadow Copies" tab.
After enabling the shadow copy, it will show in the box below, and the "enable" button will change to "disable".
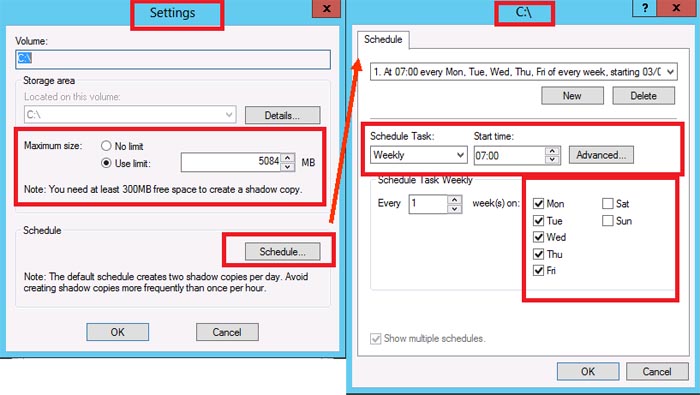
VSS can be scheduled to snapshot information for the state of current shares, and once active holds the previous version data in a hidden folder on the volume which, by default, can be up to 10% of volume size. The VSS data is stored in the C:\System Volume Information folder.
VSS in Action:
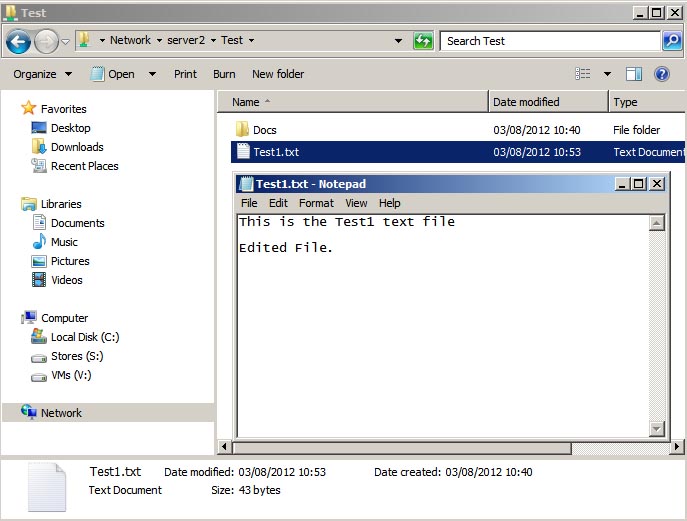
In this section, we are going to walk through an example of VSS in action. In this scenario, a user browses across the LAN to a share (Test) held on a volume with VSS turned on and activated, and modifies a file in the shared folder.
The user saves the modified file, and then decides he\she made an error, and wishes to revert the file back to how it was. To do this, right click on the file, select "properties" and click on the "Previous Versions" tab. Select from the previous versions listed, and then click on the "Restore" button to revert the file to the selected state.
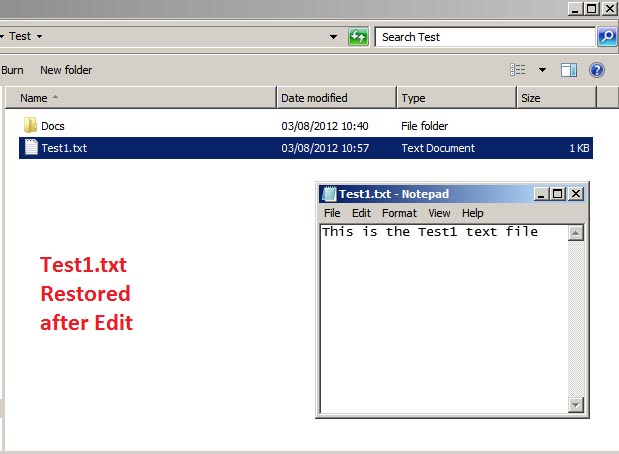
The file is back to its original version.
An accidentally deleted file can also be restored if you remember the name of the file. To do this, recreate the file and give it the same name as the deleted file. Then follow the steps above.
Advanced Boot Menu Options:
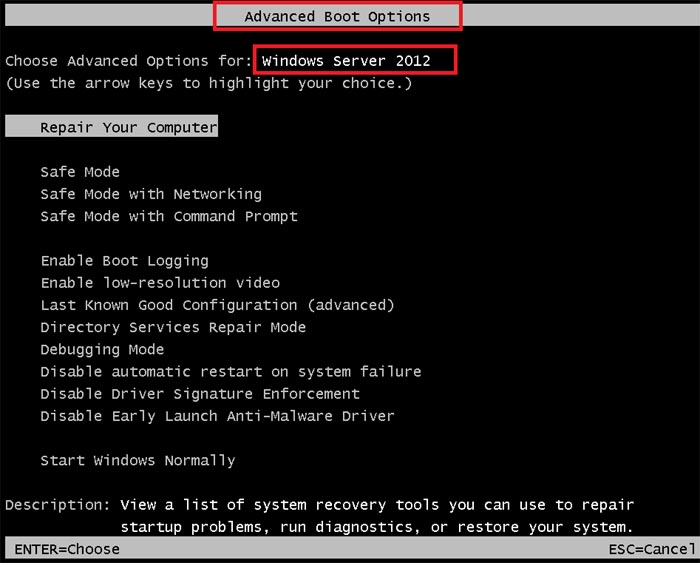
If a system will not boot up as normal to the point of the logon prompt it may still be possible to access advanced boot menu options. The options may provide a means to resolve any system startup issues. At bootup, Windows systems can be forced (via several methods) to offer up several startup diagnostic options including:
Safe Mode
Last Known Good Configuration
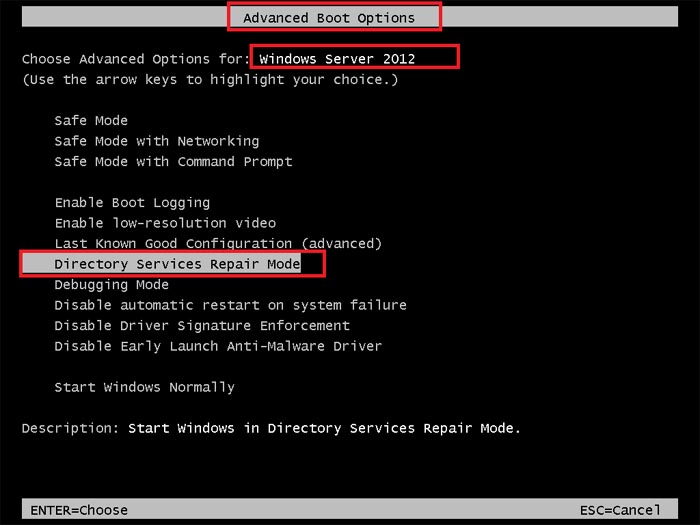
Directory Services Repair Mode (for DC servers only)
Due to the fast booting nature of Windows 2012 Server (and Windows 8 Client) systems, accessing Advanced Boot Menu Options by pressing the F8 function key just as the operating system loads is no longer possible. Microsoft has tackled this issue utilizing a multi-pronged solution. Their new approach gives users access to advanced startup options, but without the rapid F8 key tapping option. Below are the methods for accessing the advanced boot menu:
If Windows 2012 (or Windows 8) detects a serious error, it will interrupt the boot process automatically and display the advanced boot options.
The menu can be called upon if your computer has UEFI firmware.
You can invoke the menu inside Windows itself. Such a method is done by booting into Windows 2012 and holding shift while clicking restart. Alternatively, you can navigate the Start Menu options for it.
From a command prompt or Powershell, you can run the following command: shutdown /o /r
This will force Windows to reboot into Advanced Boot Menu options.
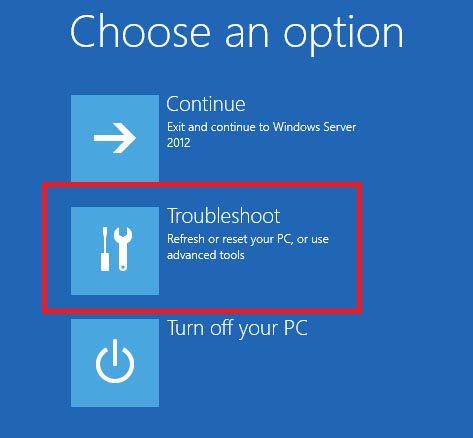
By whatever means the Advanced Boot Menu is reached, you will be presented with a screen that provides the following options:
Continue: Exits the boot menu and continues the boot process.
Troubleshoot: Provides access to what is known as the Windows Recovery Environment (RE).
Turn off your PC: Self-explanatory/
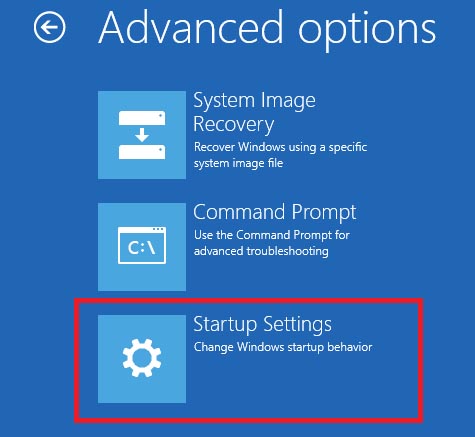
Next you are provided with a screen that offers the following options:
System Image Recovery
Command Prompt
Startup Settings - Provides options such as entering safe Mode, Last Known Good Configuration and Directory Services Repair Mode (for DC servers only).
After selecting "Startup Settings", the next screen will have a "Restart" button that you must click to get to the actual startup settings options as shown below.
Safe Mode:
Loads an operating system with only the minimal core drivers and services required to get the system up. No network drivers (unless "Safe Mode with Networking" is selected) are loaded, and network dependant services are stopped and set to a manual start option. This is a good option to select if the system stops working after installing a new device or driver.
Last Known Good Configuration:
Each time you boot a system and logon the configuration information for the system is stored in the Windows Registry in the following location: HKLM\Systems\CurrentControlSet
After a successful startup and logon, a backup copy of the system configuration is stored in this location. This backup is used should the current configuration information become corrupt, or the system has startup problems such as drivers\services failing to load.
This backup is what the Last Known Good Configuration uses to enable the possibility to roll the system back to a configuration set that previously worked.
Directory Services Repair Mode:
This option is only available on DC Servers. It is a safe mode that provides a means to maintain or rectify problems with an Active Directory database. This mode allow for a restore of an AD database to be initiated, to replace a corrupt or invalid ntds.dit file. This mode also allows for the AD database to be defragged and have a health check.
Other Startup Settings Options:
Enable Boot Logging: Creates a log file called NTBTlog.txt, which lists drivers loading or failing to load. Useful to run this option when a server is working fine, so the file can be compared against a log created when the system fails to identify differences which may resolve a problem.
Enable low-resolution video: Used if a corrupt\invalid video driver is loaded causing unreadable video output to the screen. This option loads a standard VGA driver with 640 x 480 pixel resolution.
Debugging Mode: Uses a serial port to log boot information to another device.
Disable automatic restart on system failure: Allows the Blue Screen of Death STOP error messages to remain on screen long enough so they can be noted and used for investigation, otherwise if STOP error messages occur the system reboots automatically, often to quickly to note down STOP error messages on the screen.
Disable Driver Signature Enforcement: Windows drivers used to boot the system are digitally signed by Microsoft (have a digital certificate) to prove legitimacy and ensure the drivers have been approved\authenticated. This feature can be turned off if required to investigate drivers that are loaded at bootup.
Disable Early Launch Anti-Malware: As malware continues to evolve, more computer infections are starting to use boot drivers to load viruses and other types of malware early in the boot process. This makes detecting and removing these types of infections much more difficult. Windows 2012 and Windows 8 include a very important security feature called Early Launch Antimalware that allows antivirus programs to scan boot drivers for viruses before they are loaded. If the boot driver that is about to initialize is considered malware the antivirus program can then prevent the malicious driver from loading. There may be a situation when you need to disable boot time malware detection in order to investigate a Windows problem.
Recovery Environment - Command Prompt:
If a system will not boot up even to the point where you can access Advanced Boot Menu options there is a Tool\mechanism you can use to attempt to rectify the system so that it boots up normally again. This Tool\Mechanism is the Recovery Environment which among other things offers a series of commands available from a command prompt which can be used in an attempt to repair a damaged system. The Recovery Environment Command Prompt tools may be of particular use if there is a suspected problem with a hard disk's boot sector, suspected corrupted hard disk sectors, or corrupted startup services causing issues.
When you use the Windows Recovery Environment Command Prompt tools, you can obtain limited access to the NTFS file system, FAT, and FAT32 volumes without starting the Windows graphical user interface (GUI).
In the Windows Recovery Environment command prompt, you can perform actions that include:
Use, copy, rename, or replace operating system files and folders and recover files (Copy and Recover).
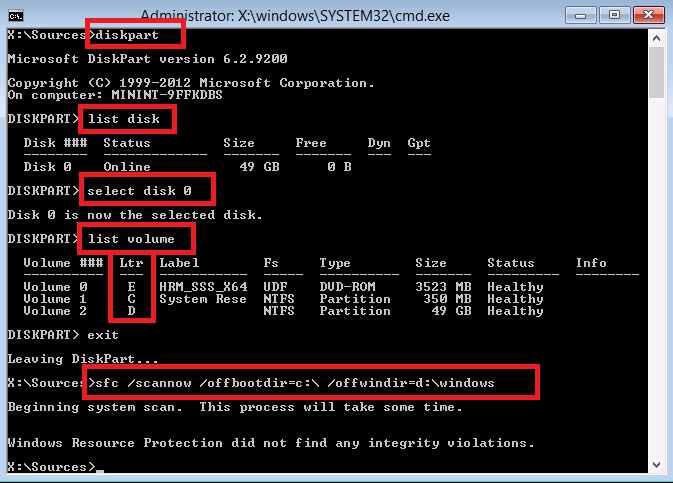
Create and format partitions on drives (diskpart).
Repair the file system boot sector or the master boot record (MBR) (bootrec).
Manage system partition files (bcdboot).
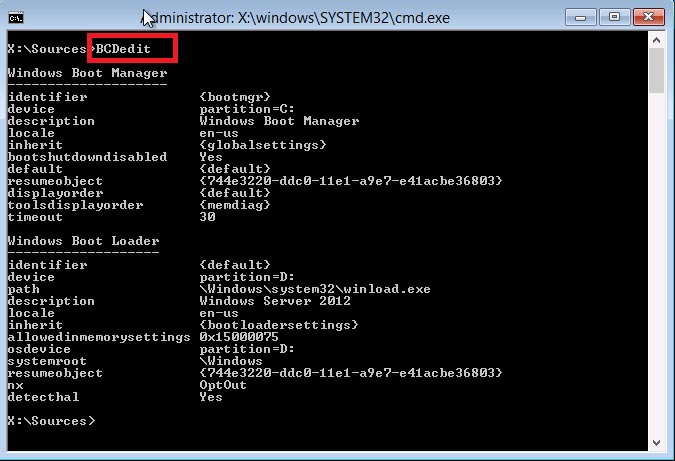
Change the Windows boot settings (bcdedit).
Check\Repair Windows System Files (sfc).
In order to use the Windows Recovery Environment Command Prompt tools, follow these steps:
Configure the BIOS to ensure the computer is to start from the CD\DVD or USB drive.
Boot to a Windows Server 2012 CD\DVD or copy of the Windows 2012 source files on a bootable USB.
Restart the computer and boot to the Windows Server 2012 CD\DVD or the applicable USB containing Windows 2012 source files and launch a normal Windows 2012 Server installation process (setup.exe file etc.)
When the Windows Setup Screen appears, select English\UK settings.
As the Install Windows Setup Screen continues, select "Repair your computer".
Choose "Troubleshoot" on the next screen.
Choose "Command Prompt" on the Advanced Options screen.
At the command prompt, type the appropriate Recovery Environment commands to repair your Windows Server 2012 installation.
Boot Configuration Data (BCD):
Starting with Vista, BCD replaces the settings in boot.ini. BCD is an acronym for Boot Configuration Data, more importantly, it gives you control of what should happen when your Windows 8 or 2012 computer starts.
In Windows 8 and Windows 2012 if you have a hidden system partition created by default (350 MB in size) that is used to boot the operating system, that system partition gets the boot-environment files from the operating-system image %WINDIR%\boot folder. Thus, if the files on the hidden system boot partition get damaged you can recover them from the set that will still be stored in your %WINDIR%\boot.
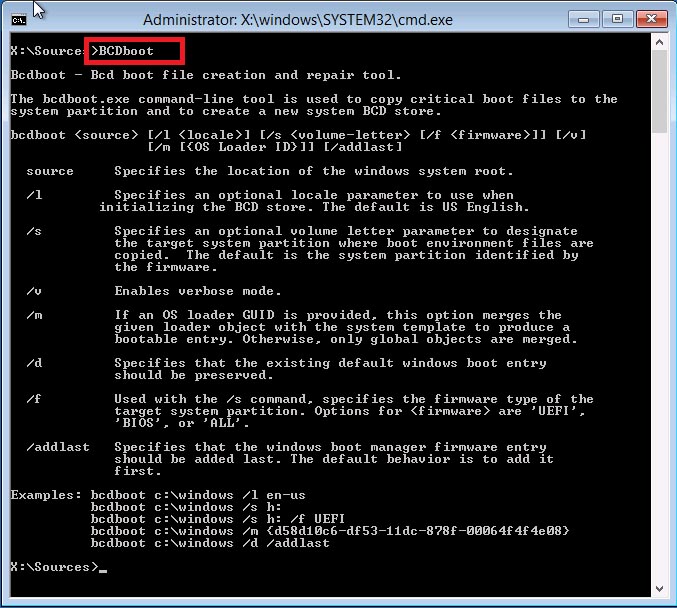
BCDBoot and BCDEdit allow you to setup/repair a system partition and display/change how Windows boots up respectively.
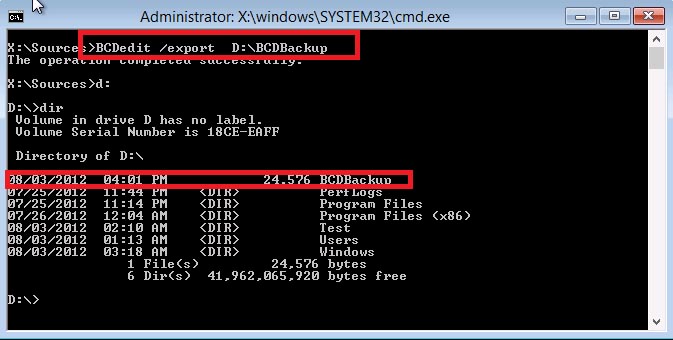
We can use the BCDboot command to make a USB drive (lets say identified by the letter G:) bootable by copying the boot files from the folder C:\Windows by typing the command:
BCDBoot C:\Windows /s G: /f ALL
The /f ALL ensures that the USB boot will work on both UEFI or BIOS based computers (in other words, all firmware).
The BCDedit command is mainly used in dual-boot scenarios.
It also allows you to copy the boot data to a file (create a backup).
System File Checker (SFC):
The System File Checker scans and verifies the integrity of all system files, and attempts to resolve any problems including the replacement of missing system files. In the figure below, /offbootdir specifies the volume where the boot directory resides (BCD) and the /offwindir specifies the volume where the Windows directory is located.
Backups:
Backups are really the main line of defense against data loss and complete system failure. Hardware can be replaced. Operating systems and Applications can be re-installed. However, the unique data files stored on your network\systems and the unique system and application configurations cannot be easily put back in place. Using the built-in backup tool that ships with Microsoft systems, you can back up both unique data files generated by the users of the network, and core system and application configuration information to a selected media.
There are 3 main backup\restore scenarios:
Backup\Restore a few selected data files\folders
Backup\Restore an Active Directory database (If system being backed up\restored is a DC Server)
Backup\Restore a whole system (a complete server failure scenario)
Windows Server 2012 offers backup facilities for each of these scenarios, or you can purchase 3rd party software.
When using the Windows backup tool or a 3rd party backup program, there are several options as to where the data is backed up to and restored from. These options include a local or network drive, CD/DVD, or USB drive. Tape drives are not supported in Windows Server 2012.
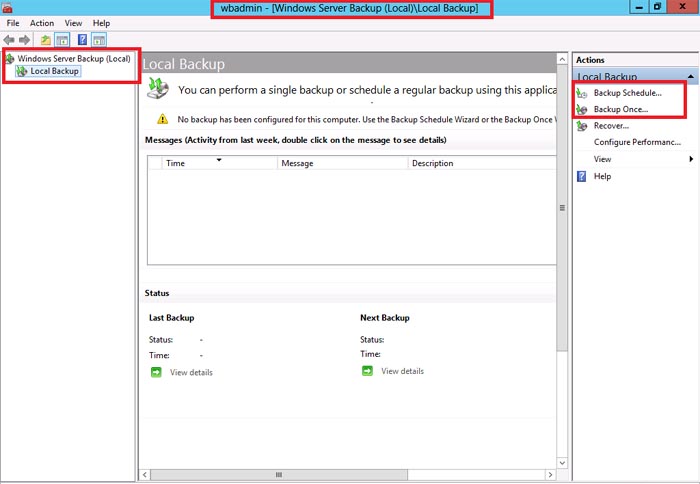
For Windows 2012 Server, the Backup Tool (wbadmin) is not installed by default. It needs to be added as a role from Server Manager (from within the Application Server Role option). Once installed the built-in backup Tool can used as a graphical tool or can be used as a command line based Tool.
Backups are performed using a GUI backup program located at Start->All Programs->Administrative Tools, or a command line executable file called WBADMIN.MSC. Backups can encompass whole volumes, and entire system (including system state data), or individual folders and files. Backups can be initiated manually and run there and then, or scheduled. Backups can be performed to a local volume not included in the backup which includes CD\DVD\USB drives, or network drive. Backup to dynamic volumes is not allowed. Below are the various backup types.
Normal: copies all selected files and marks them as being backed up.
Incremental: copies only files created/changed since last full backup and marks them as being backed up.
Differential: copies only files created/changed since last full backup and doesnt mark them as being backed up.
Daily: copies only files created/changed today and doesnt mark them as being backed up.
Copy: copies all selected files and does not mark them as being backed up.
Backup Tools operate in one of 2 ways:
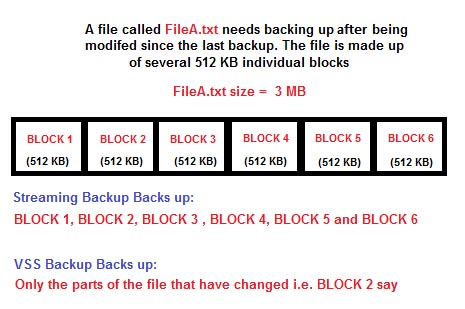
Streaming Backup: A legacy backup mechanism employed by the native Windows 2003 backup tool NTBACKUP. Backs up all individual parts of files selected for backup and streams the backup out to a single formatted\compressed backup file.
Volume Shadow Service (VSS) Backup: A more modern backup mechanism employed by the native windows 2008\2008 R2 and 2012 backup tool WBADMIN.MSC where snapshots of whole volumes or non archived blocks that make up individual files on volumes are backed up rather than all individual parts of files selected for backup.
System State Data:
System State data contains most elements of a system's configuration, but it might not include all of the information that you require to recover your system from a failure. Therefore, it is recommended that you back up all boot and system volumes, including the System State, when you back up your system. The system state data is comprised of the following:
Registry Files
COM+ class registration database
System files that are under Windows File Protection (WFP)
Boot files
Certificate Services database
SYSVOL directory
Cluster service information
Active Directory database (ntds.dit) if a domain controller
IIS metadata
If you choose an alternate location for restoring the System State data, only the system boot files, registry files, SYSVOL directory files, and Cluster service database information is restored to the alternate location. Active Directory, the COM+ class registration database, and the Certificates Services files are not restored.
Configuring Backups:
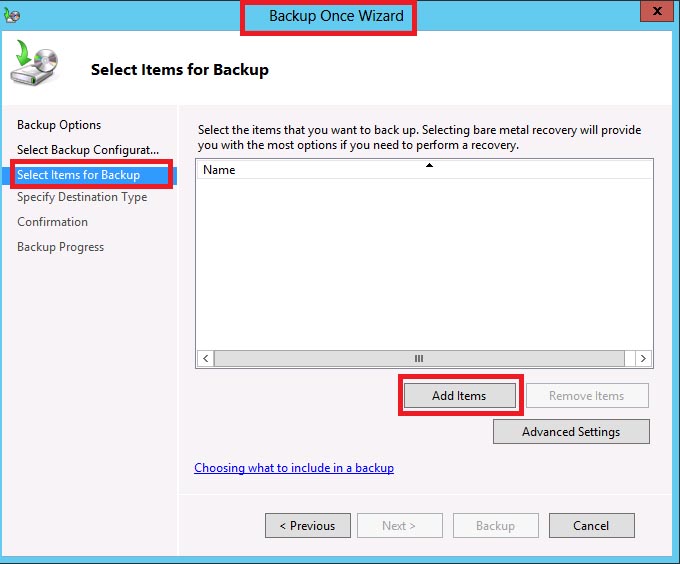
In order to run a backup, you must have backup permissions. After launching WBAdmin, you can select to run a single backup, or create an automatic backup schedule.
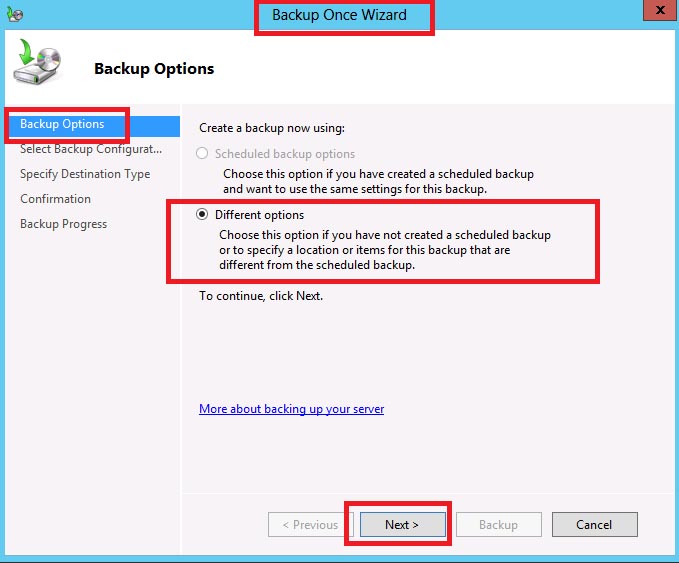
In this example, we are performing a one-time backup. On the next screen, you can choose to use the settings from a previously scheduled backup, or enter new different settings.
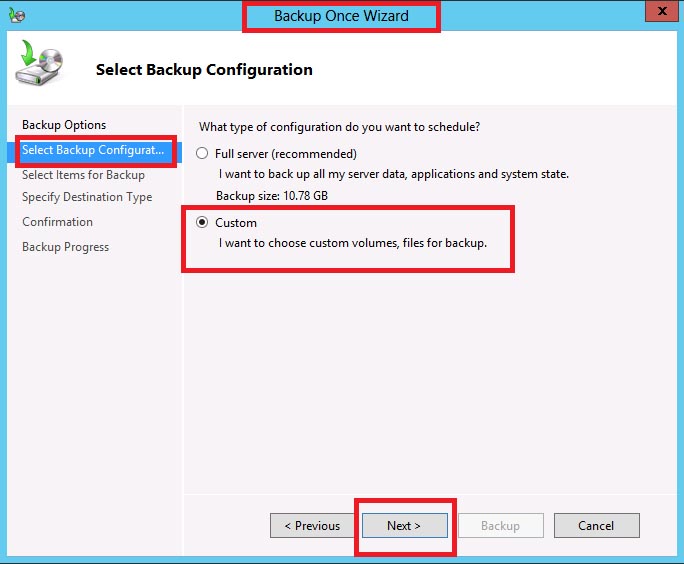
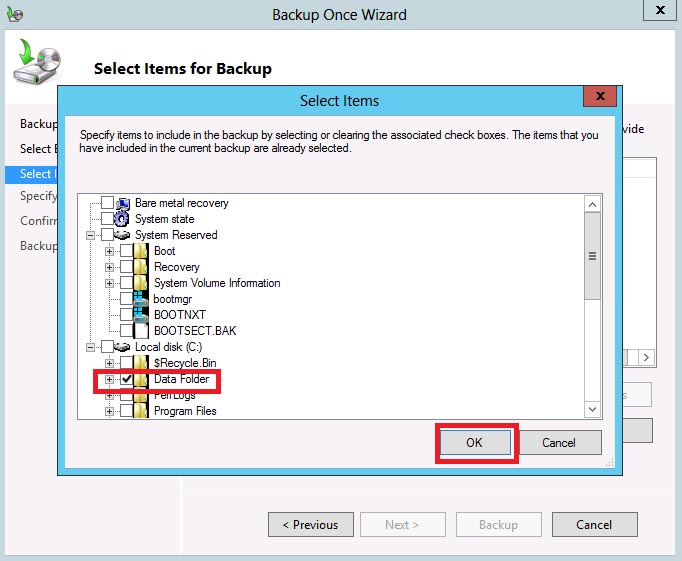
Windows 2012 can backup individual files and/or folders (Custom option), or you can perform a full backup.
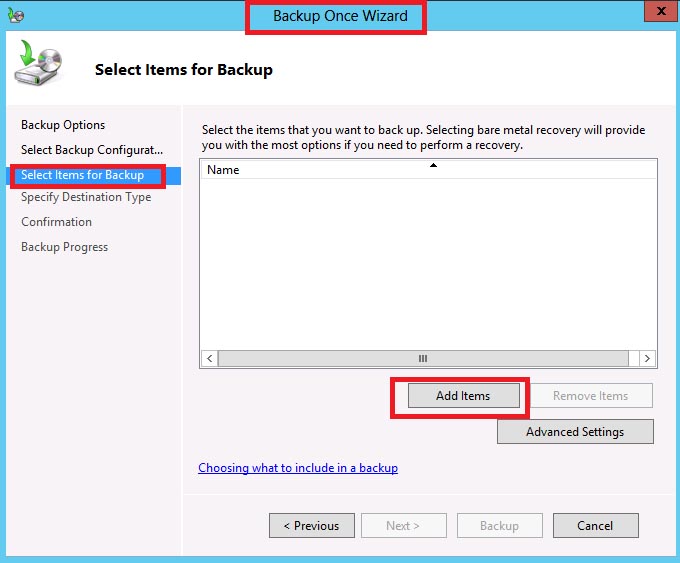
On the next screens, you can choose the items to be backed up.
Note that the "Bare metal recovery" backs up the entire system. Selecting this will automatically check all of the other boxes.
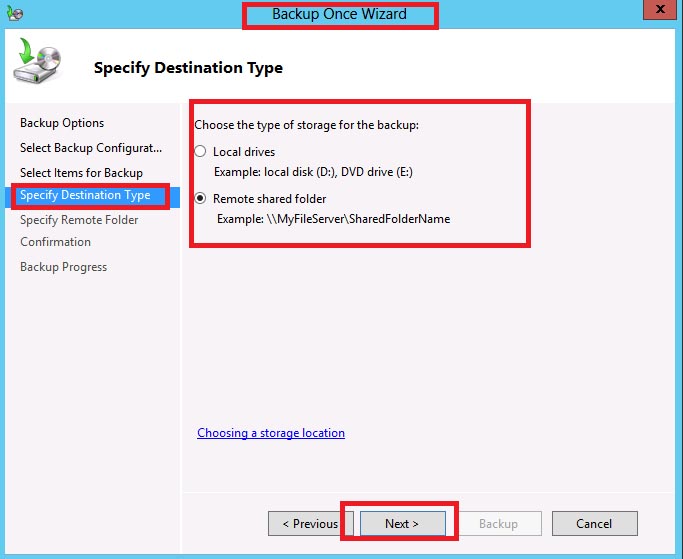
The next screen allows you to choose where the backup files will be created. You can choose between a local drive which includes hard drives, USB drives, and DVD, or you can select a shared folder on a remote computer.
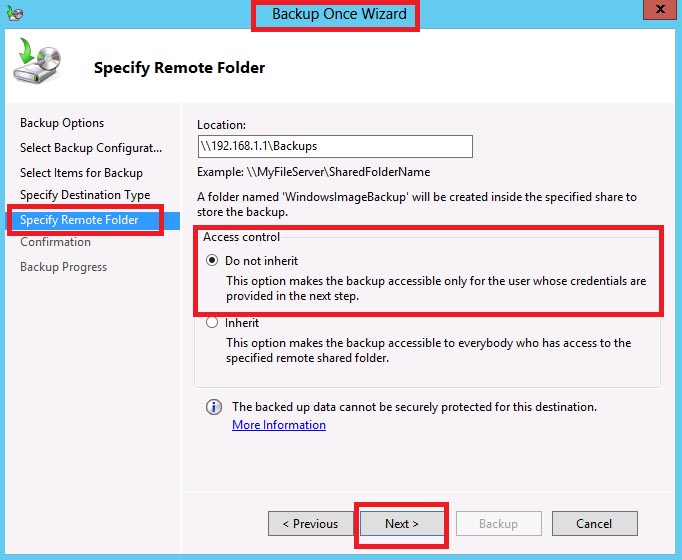
If specifying a remote folder as we did in this example, you will next need to set the access control for the backup files. "Do not inherit" makes the files only available to the user with write permissions that is specified in the next step. Selecting "Inherit" causes the backup files to inherit the permissions of the shared folder. Anyone who can access the folder, can access the backup file(s).
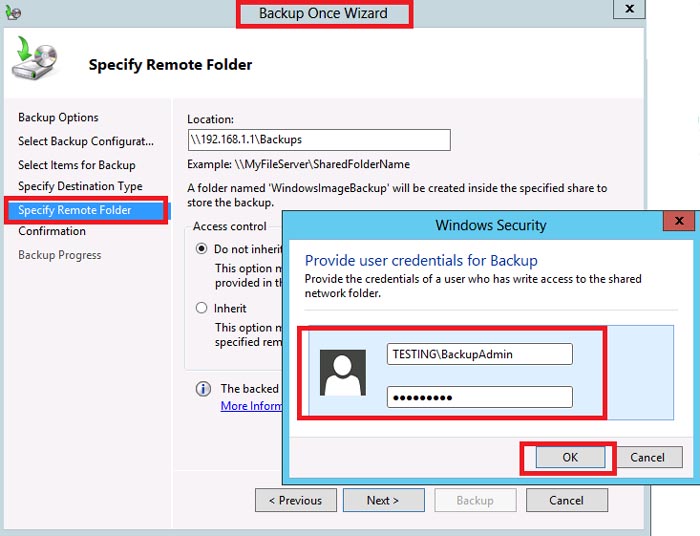
In this example, we selected "Do not inherit" which takes us to a screen where we must provide the login details for a user that has appropriate permissions for the shared folder.
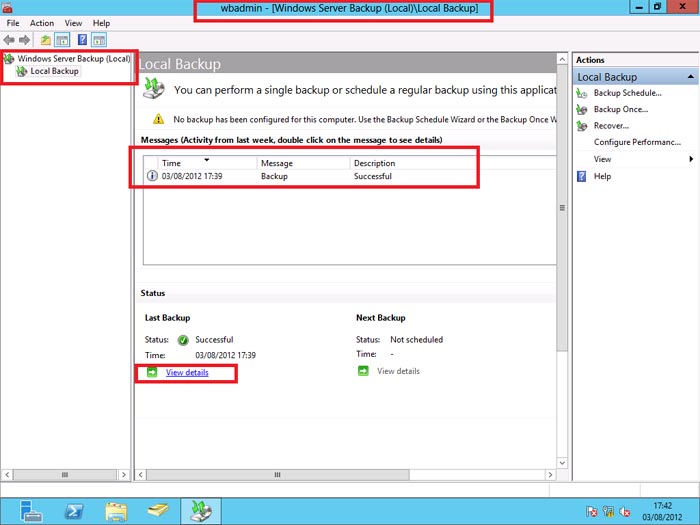
Next you will receive a confirmation screen that allows you to verify your settings. Click the "Backup" button to begin. The next screen will show the progress of the backup, followed by a screen showing that is has completed. For further verification, you can go back to the WBAdmin console and see your recent backup.
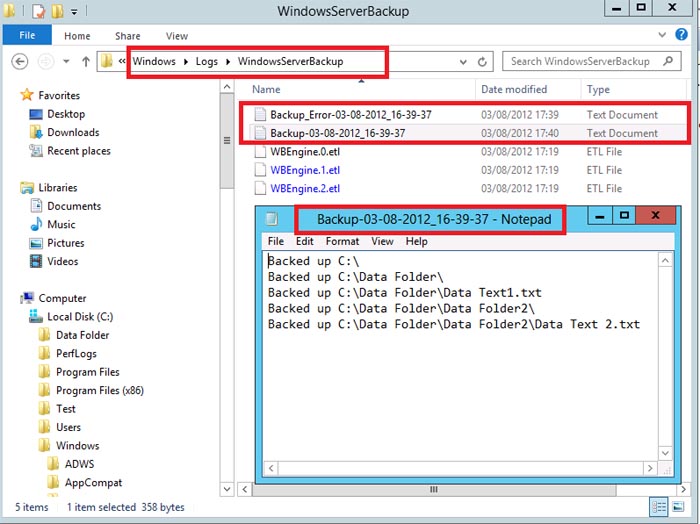
If you click on "View details", you can view the log files which are pulled from their location at %windir%\Logs\WindowsServerBackup.
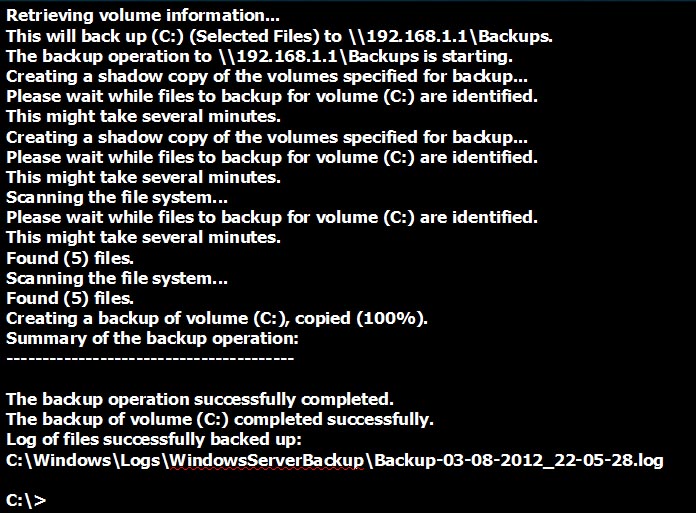
You can also use the Windows Server 2012 backup Tool to backup selected files and folders using a command line instead, as shown below.
Note: The backed up data cannot be securely protected at this destination. Backups stored on a remote shared folder might be accessible by other people on the network. You should only save your backups to a location where you trust the other users who have access to the location or on a network that has additional security precautions in place.
Note: *** would be the password for the AD user BackupAdmin.
Restoring Data:
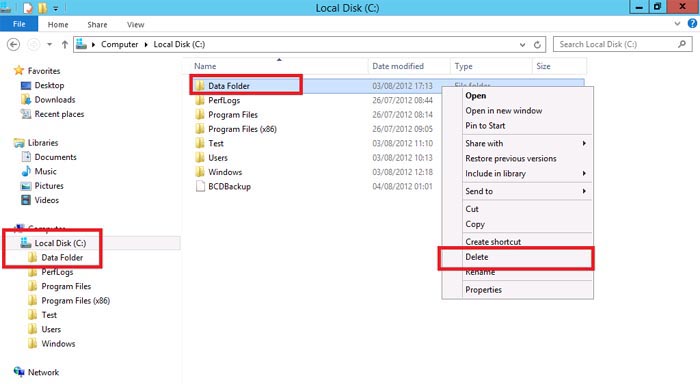
The following section will show how to restore files and folders. We'll first simulate data loss by deleting a folder as shown below.
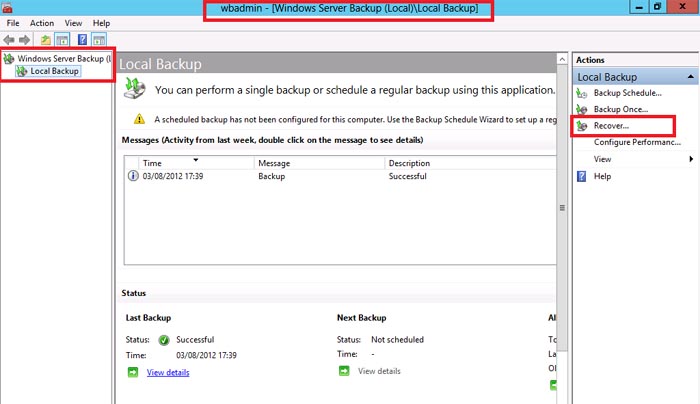
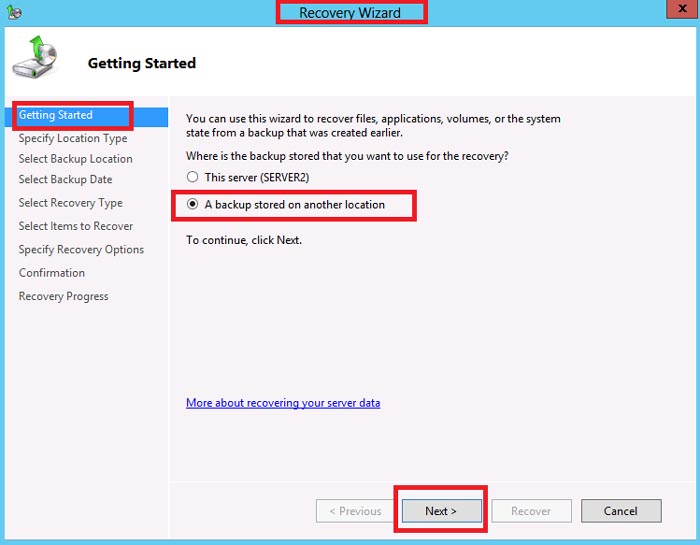
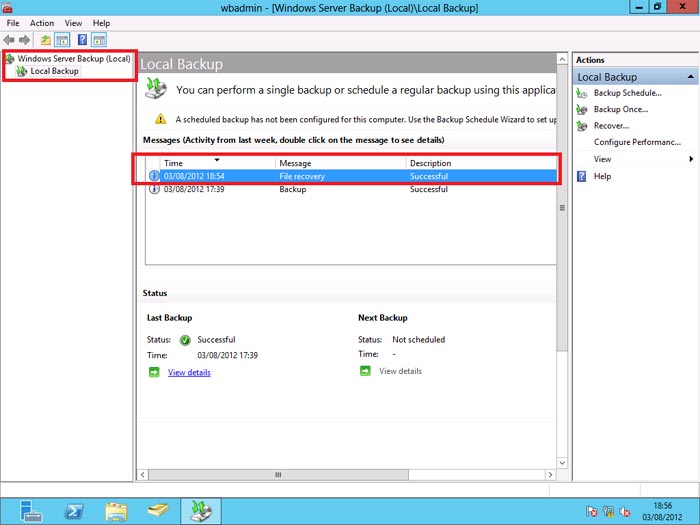
First, open the backup tool and select "Recover" in the right pane.
Next, select the location where the backed up data is stored (In this scenario we backed up the files\folders to a network share).
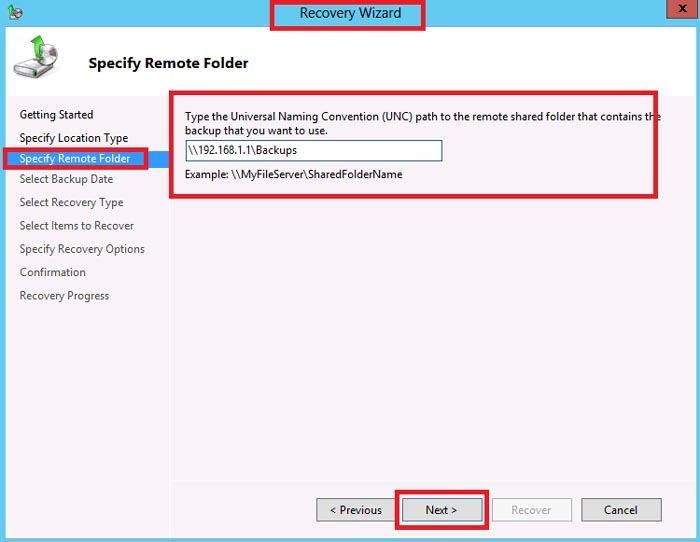
Next, specify the specific location of the folders/files by entering the UNC path to them.
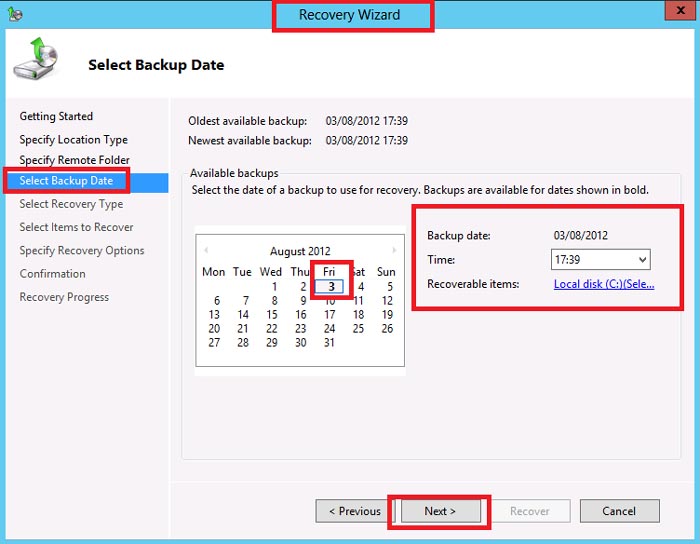
On the next screen, dates on the calendar in which a backup exists will be bold. Click on the desired backup date and select the backup. Note that in our example, we only have 1 backup to choose from on the 3rd.
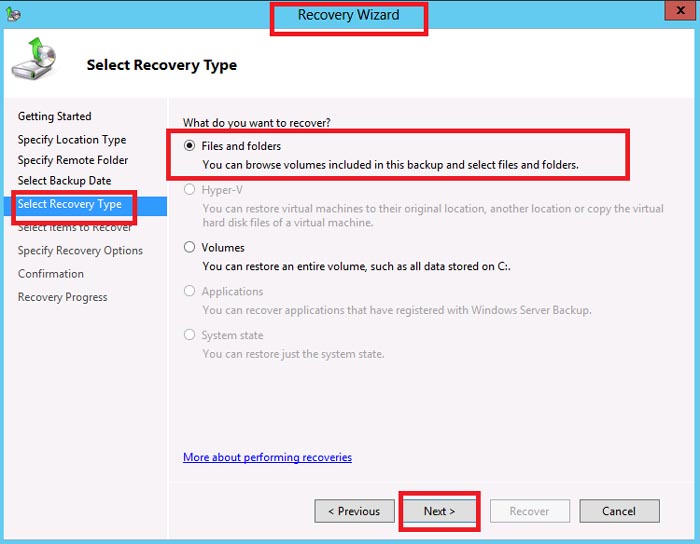
Select the type of data you wish to recover.
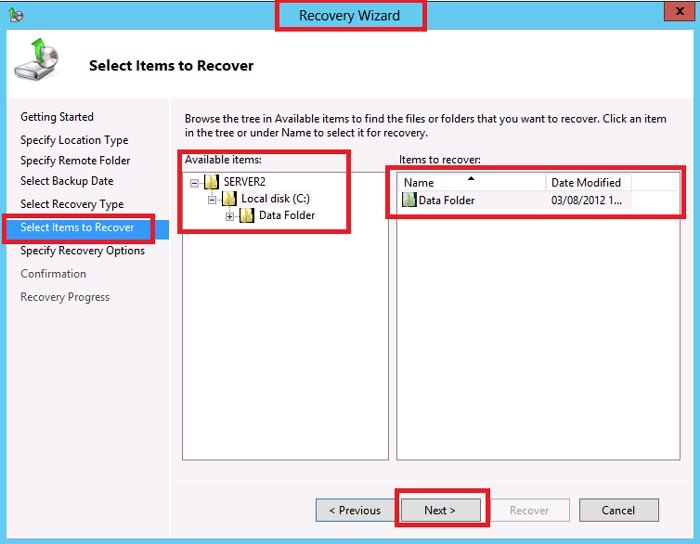
On the next screen, from the "Available Items" pane, select the files/folders you wish to recover.
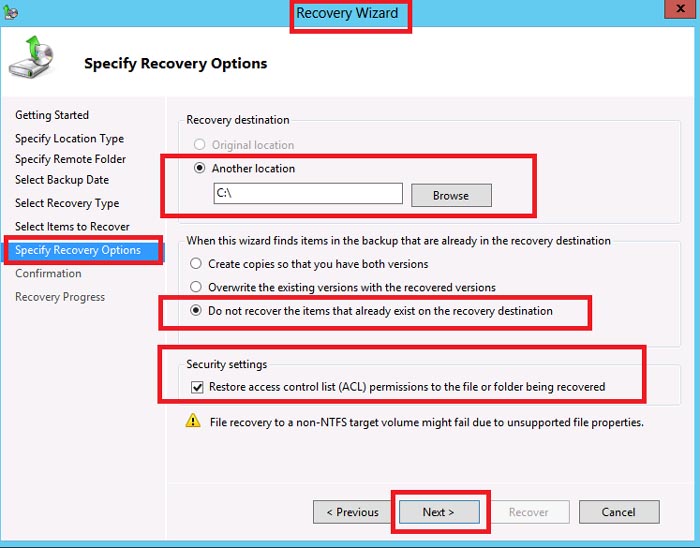
Next, choose the location to restore the data, whether to overwrite or create copies, and choose to restore the NTFS security settings. The "Original Location" option in the Recovery destination section will be greyed out if the backup set selected is not the latest backup set, or if the backup set has been moved from its original location.
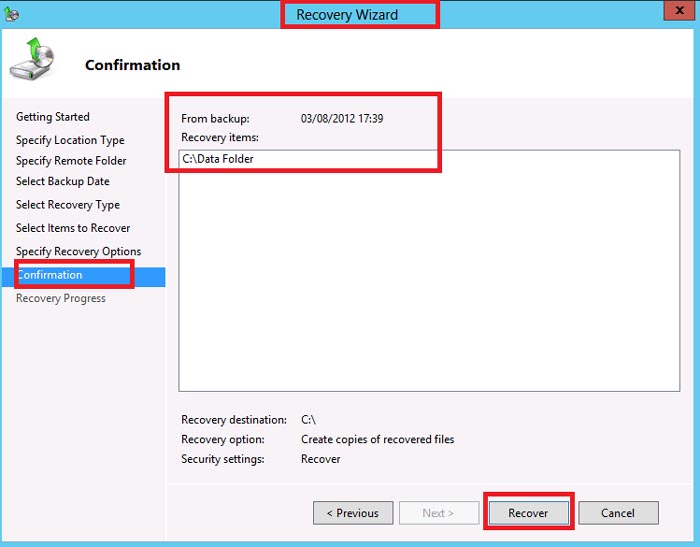
On the next screen, confirm your settings and click the "Recover" button to begin recovering your folders and files.
On the next screen, you should see the completed file recovery in the messages list with a "Successful" designation.
The folder and permissions have been restored, however, if the folder was shared before, the sharing will need to be recreated.
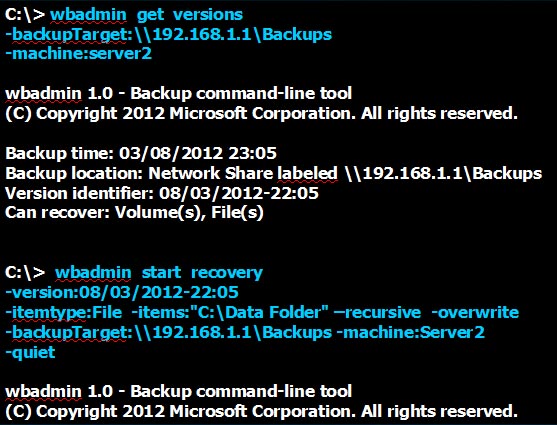
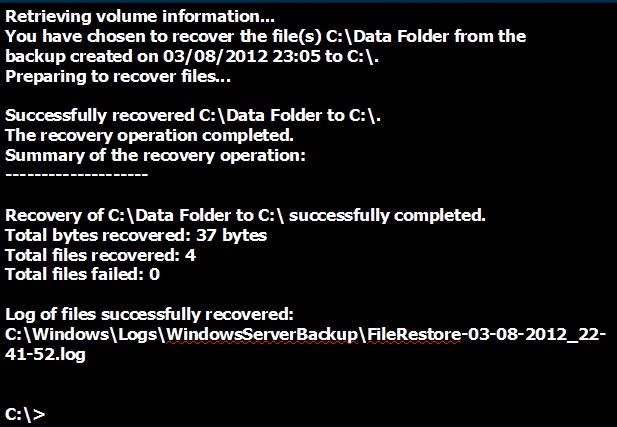
You can also use the Windows Server 2012 backup tool to recover selected files and folders using a command line instead as shown on the next 2 slides. Here the backup is first identified from the network share it is stored on using the wbadmin get versions command. Then we run the wbadmin start recovery command with the following switches:
-itemtype and -items) Specifies the type of data to be recovered and the specific files/folders.
-recursive - Recovers the files in the folders and all files subordinate to the specified folders. By default, only files which reside directly in the specified folders are recovered.
-overwrite - Overwrites any duplicate files that exist in the target directory.
-quiet - The recovery runs without any prompts.
Backing Up System State and Active Directory:
Now lets look at backing up the Active Directory structure of our domain environment. Of course, normally AD data would be backed up as part of a full backup of a DC, but here we will show how AD data can be selectively backed up if need be, rather than as part of a "whole system" backup.
Most of this process is just like the steps we went through for a regular data backup. To start, launch the Windows backup tool as has been shown previously. In the right pane, click "Backup Once" or "Backup Schedule" depending on which your situation. On the next screen, select "Different options", and then the "Custom" radio button and the "Next" button on the following screen.
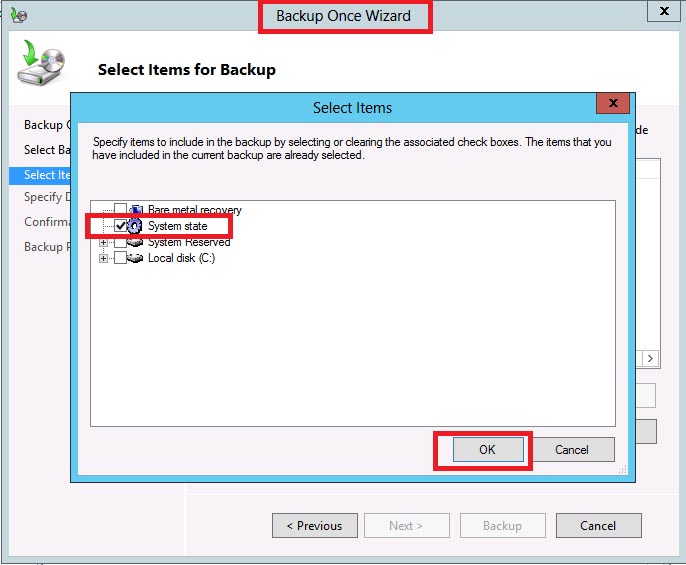
Next, select "Add items".
Check the "System state" checkbox and then the "OK" button.
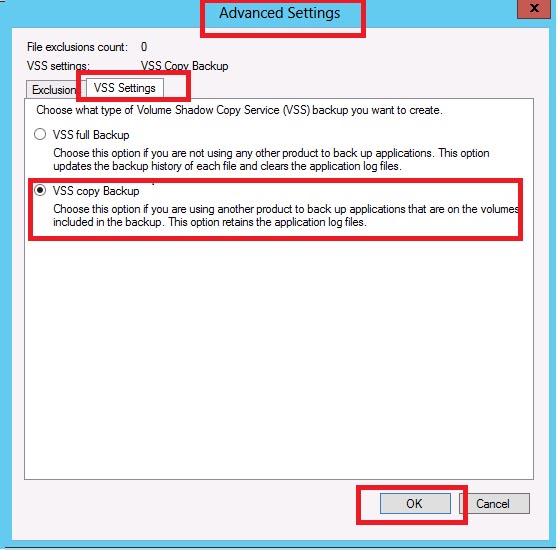
If you are using any 3rd party products to back up applications that are on the volume included in the backup, you will want to click on the "Advanced Settings" button. On next screen select the "VSS Settings" tab, and ensure that the "VSS copy Backup" radio button is selected. This will retain the application log files.
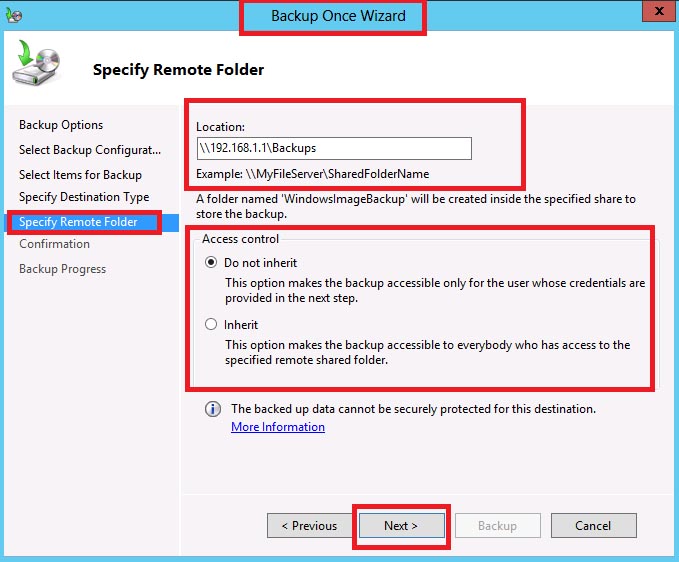
When back to the "Select Items for Backup" screen, click the "Next" button. On the following screen, choose "Local drives" or a "Remote shared folder" and click "Next". Then, enter the destination location (UNC path) and set the access control for the backup files that will be created. Click "Next".
You will then be asked to provide the credentials for a user that has write access to the shared network folder. After entering that information, click "OK". On the confirmation screen, click the "Backup" button. You will then see the backup progress screen, and completion page when finished.
Restoring System State and Active Directory:
Active Directory data restoration requires starting up the DC Server in Directory Services Restore Mode (DSRM), one of the Advanced boot menu options. AD data can be restored using the backup tool GUI that was used to create the backup in the first place, or using the command line version of the backup tool (wbadmin) for an AD restore (we will use the latter here)
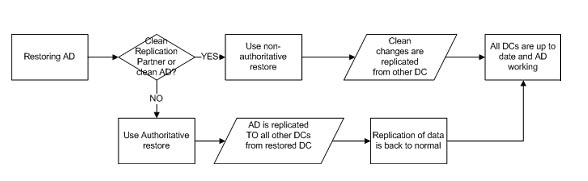
The AD data can be restored complete (all of the AD database restored) or selected AD Objects. In addition, the AD restore can be non-authoritative or authoritative as explained below.
Non-Authoritative: This addresses a DC server rebuild when no Active Directory data was lost. In other words, it is still on other DCs in the domain, but this one particular DC server has experienced a problem with its database. For a non-authoritative restore, restoring System State data would be all that is required. Once restored it will pick up AD replication updates from the other working servers.
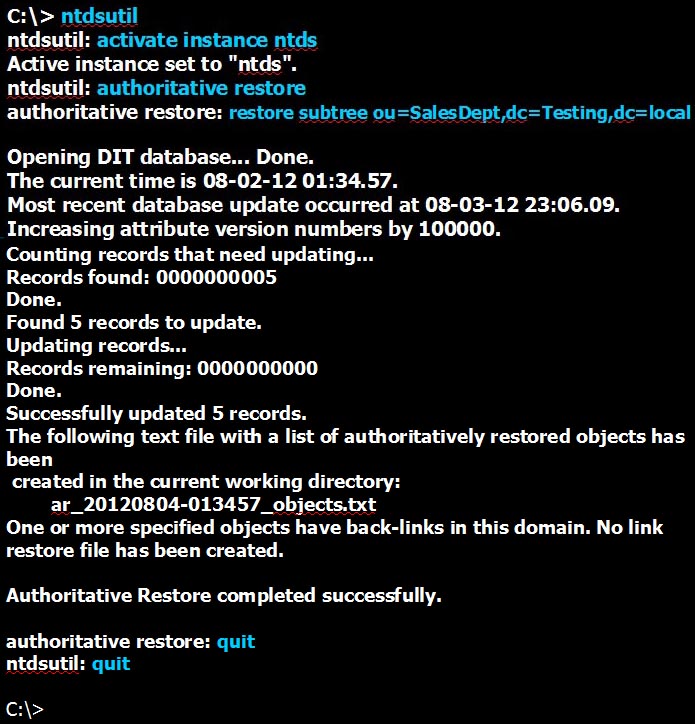
Authoritative: In this situation, some AD data has been lost from DC Servers across the domain (perhaps via accidental deletion of AD objects). The lost data needs to be restored from backup, and the DC Server it is restored to must be set as authoritative so that it will initiate the first replication out of AD data to any other DC Servers. For an authoritative restore, you would need to use the ntdsutil command to specify the data to be restored is to be replicated out to other DCs.
Begin by rebooting the server into Directory Services Repair Mode.
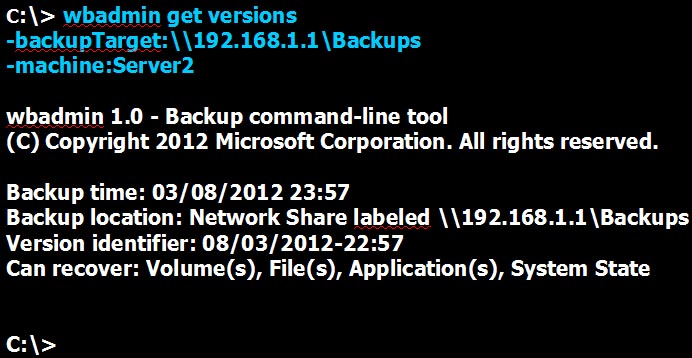
First, bring up a command prompt and locate an ID for the backup set (for Server2) you wish to restore System State data from (on the LAN share at \\192.168.1.1\Backups in our example).
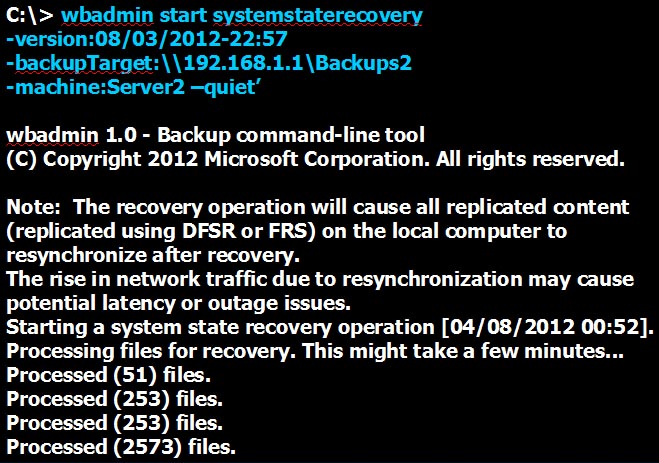
Next, use the start systemstaterecovery command to restore AD data.
After the restore is completed, you should receive a successful confirmation.
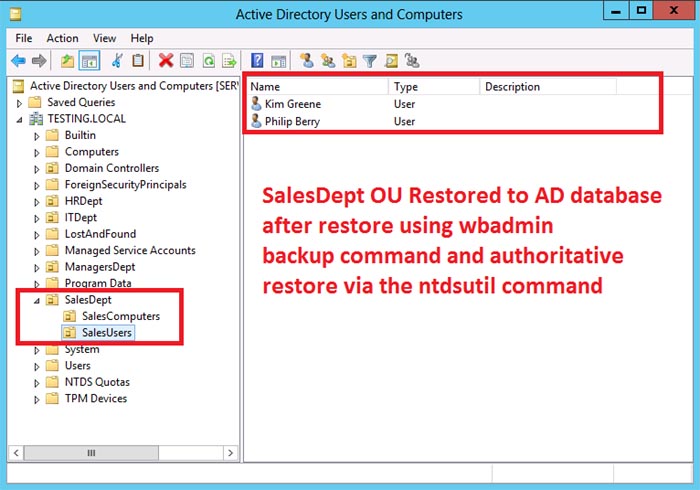
You will be prompted to restart the server at this point. Do not restart yet if you wish to perform an authoritative restore. To do this, we need to run the ntdsutil command. Note: Only an OU is being restored (using restore subtree), not the whole AD structure. For the whole AD database structure to be restored authoritatively you would type restore database instead.
After restore completes reboot the server (shutdown /r /t 0) and check AD database on this DC server. Then check other DC servers in the domain to ensure the restored AD Data has been replicated (repadmin /replicate).
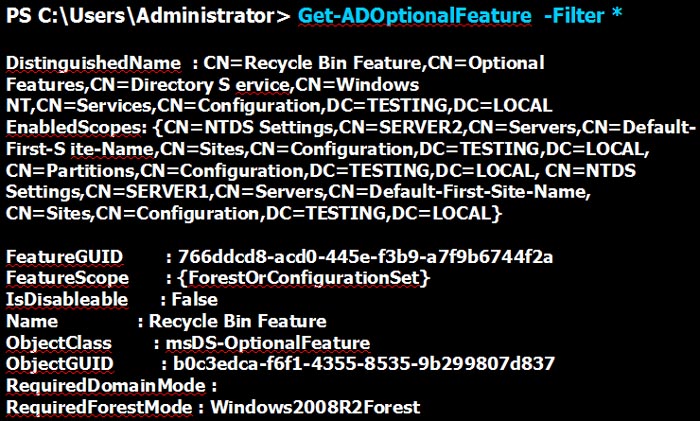
Active Directory Recycle Bin:
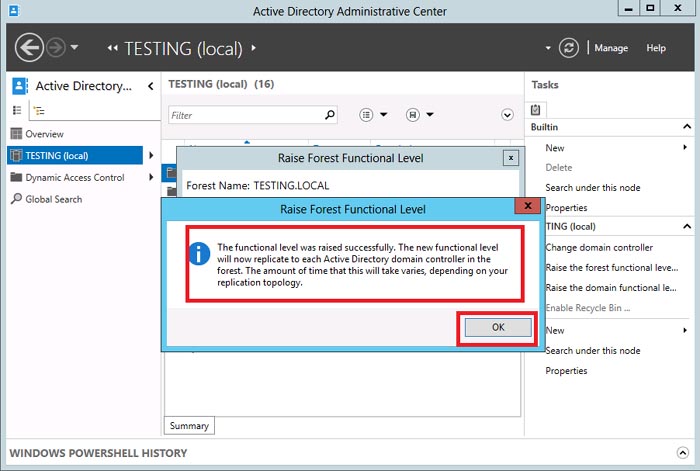
Windows Server 2012 Active Directory now has its own AD Recycle Bin to allow Administrators to restore Active Directory objects that have been deleted, and this in part can save relying upon the Backup mechanism we have just examined. The AD Recycle Bin can be enabled through the AD Administrative Center Tool. The AD Recycle Bin can only be enabled once the Forest Functional Level is set to a minimum level of Windows Server 2008 R2. To perform this procedure, you must be a member of the Enterprise Admins group, or you must have been delegated the appropriate authority.
After you set the forest functional level to a certain value, you cannot roll back or lower the forest functional level, with the following exception: after you raise the forest functional level to Windows Server 2012, you can lower it to Windows Server 2008 R2. If Active Directory Recycle Bin has not been enabled, you can also lower the forest functional level from Windows Server 2012 back to Windows Server 2008 R2 or Windows Server 2008 or from Windows Server 2008 R2 back to Windows Server 2008. If the forest functional level is set to Windows Server 2008 R2, it cannot be rolled back, for example, to Windows Server 2003.
To perform this procedure, follow these steps:
To open Active Directory Domains and Trusts, click "Start", click "Administrative Tools", and then click "Active Directory Domains and Trusts".
In the console tree, right-click "Active Directory Domains and Trusts", and then click "Raise Forest Functional Level".
In "Select an available forest functional level", select the value and then click "Raise".
If you get an FSMO Role Ownership error message when attempting to raise the Forest Functional Level, simply Force Replication (via AD Sites and Services) to ensure all DCs are in sync, then repeat the above steps.
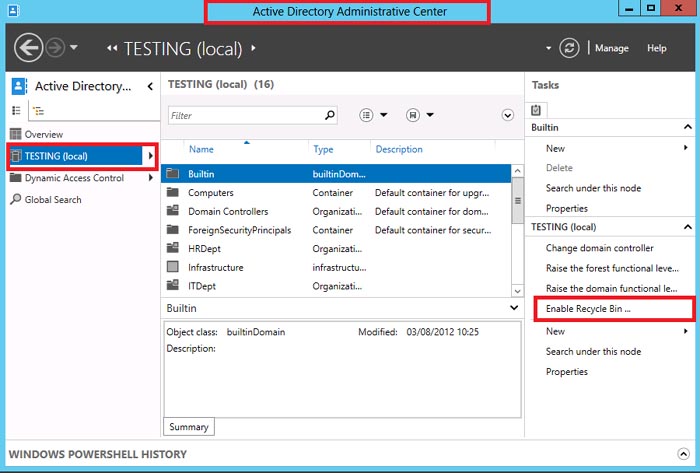
Now, to enable the recycling bin, launch the AD Administrative Center tool. In the right pane, select "Enable Recycle Bin".
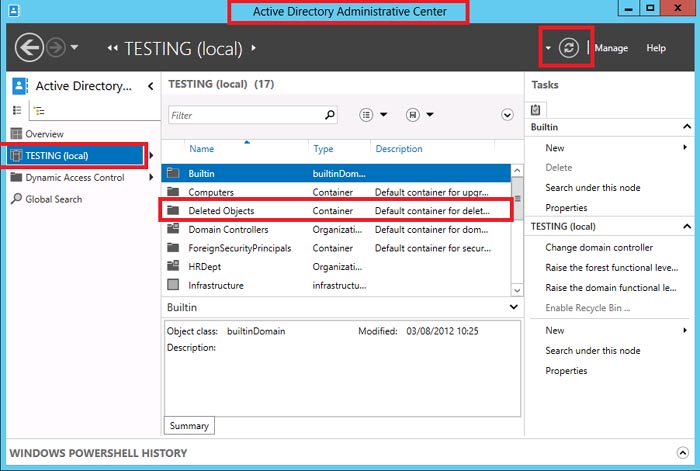
AD Recycle Bin enabling process started and will complete after either forced or automatic AD replication across all DCs in the Domain has occurred. Eventually, and maybe after a refresh on the AD Administrative Center Tool, a "Deleted Objects" container will appear from where AD Objects that have been deleted can be retrieved.
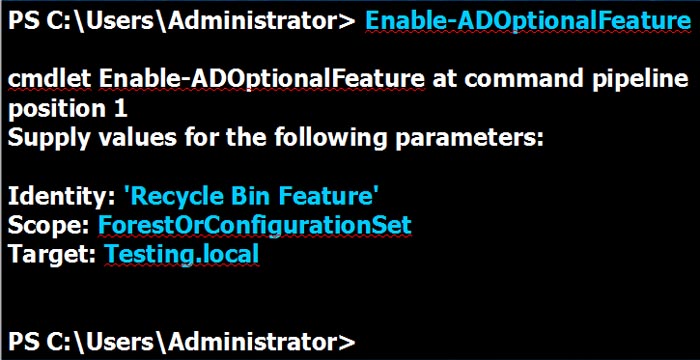
Optionally, for Windows 2012, the AD Recycle can be enabled using the AD Module for Windows PowerShell command line:
Enable-ADOptionalFeature
Identity Recycle Bin Feature
Scope ForestOrConfigurationSet
Target Domain_Name
If already enabled, the above is not required and will give an error message. To check if the AD Recycle Bin has been enabled using the AD Module for Windows PowerShell, enter the following command:
Get-ADOptionalFeature -Filter *
If the recycle bin is not enabled, this can also be accomplished via PowerShell as shown below.
Once the AD Recycle Bin is enabled, the AD Module for Windows PowerShell can used to View any Deleted AD Objects:
We touched on this subject briefly, and showed the option to select to do this type of backup above. A Bare Metal Recovery will ensure not only volumes held within the Windows Operating Systems are backed up, but all other disk partitions\volumes that may exist on your unit across all hard disks. The previous types of backups that we have walked through are great for restoring files, folders, and system state data, however, what happens when your server fails and will not boot? With the types of backups we have explored thus far, you can reinstall Windows and restore it, however, a bare metal recovery allows you to bypass having to install the OS first.
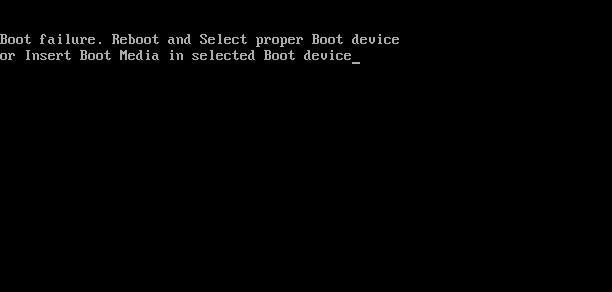
Below, we'll show how to restore your server when you receive something like the error below:
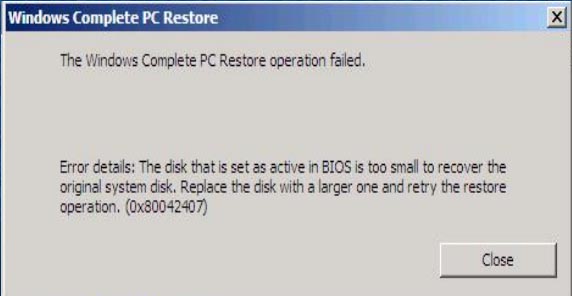
To avoid receiving errors such as shown below or errors such as - Windows Complete PC Restore Operation Failed Invalid parameter Error ID: 0x80070057, be sure to have a disk with volumes that match or exceed in size the volumes being restored from the backup (You can use the command line tool diskpart to do this) before beginning the restore process.
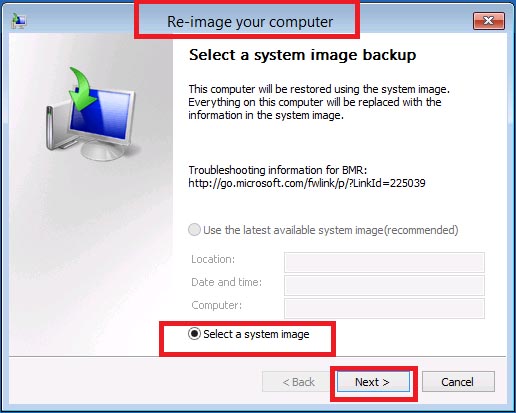
Boot the system to an installation file set for the operating system stored on CD\DVD\USB, and select the language for the system.
Next, choose Repair Your Computer, and then select "Troubleshoot" on the next screen. On the following screen, select "System Image Recovery". On the next screen (shown below), choose "Next".
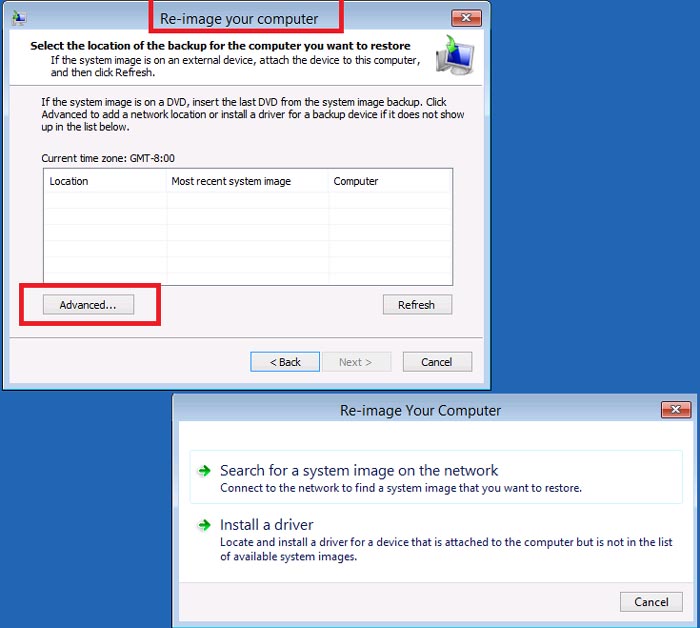
Press "Advanced" to look at network locations, or to add NIC drivers to be able to access remote LAN Shares.
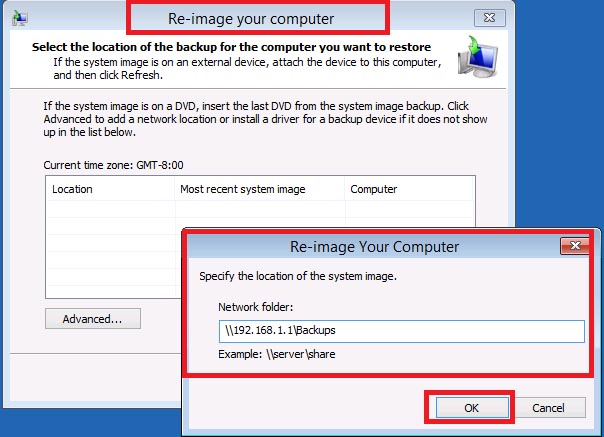
Enter UNC Path to remote Share where the Full Server Backup is located.
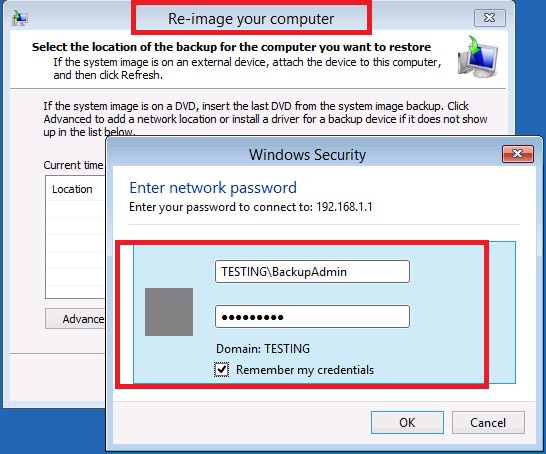
Enter an AD username and password that can access the remote Share where the Full Server Backup is located.
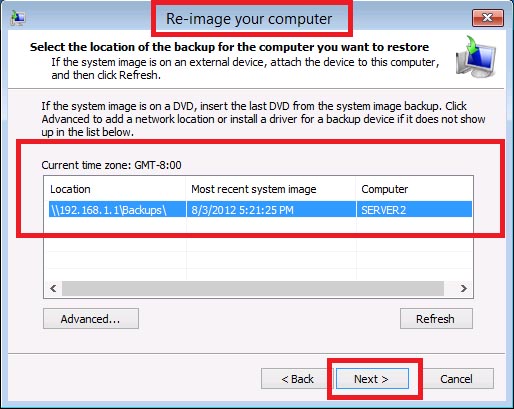
Highlight the Full Server backup Image found on the remote Share where the Full Server Backup is located and click "Next".
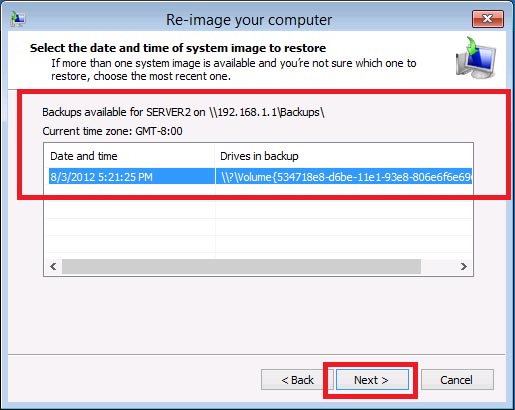
From the list, select the image to restore and click "Next".
Specify how to proceed with the restore and press "Next".
The next screen will show a confirmation of the settings you have selected. Click "Finish", and then "Yes" on the popup window to begin the restoration process. After the process is complete, you will be prompted to restart the computer. If all went well, you should boot into your restored system.