This article will cover Disk Management tools that are available in Windows XP Professional.
Using Disk Management tools in Windows XP Professional
In Microsoft Windows XP Professional, you can perform most disk administrative tasks, both local and remote, by using the Microsoft Management Console (MMC) snap-in tool called Disk Management.
A command-line tool, DiskPart, is also available in Windows XP Professional which allows the administrator to handle disk administrative tasks from a command prompt.
You can use both tools to convert disks, as well as format current partitions and unallocated space. You can also check on the status of fixed and removable disks and their associated properties.
Disk Management
Normally, you will need to be a local administrator to perform most system configuration functions (even just taking a look at the current configuration settings) on a Windows XP Professional system, and in some cases, there may be a local policy set by some other administrator or if your system is in a Domain, a Domain policy setting which may prevent you from performing some actions.
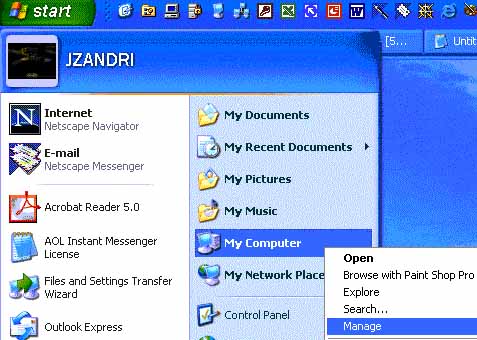
To open the Disk Management MMC, you can select Start, right-click My Computer, and then click Manage, which will open the Computer Management MMC. Under the Storage icon, click Disk Management to open the Disk Management MMC.
You can also type compmgmt.msc in the RUN box or from a command line to launch the Computer Management MMC.
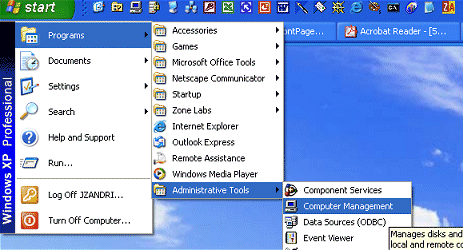
[NOTES FROM THE FIELD] - What your Start Menu options look like all depend on how you have the menu set. If you are using the Classic Start Menu, you would not see My Computer as a selection to right click on. Your options would be to click Start, select Administrative Tools and then select Computer Management. Not a whole lot different, but perhaps just enough to confuse you.
The Windows XP Professional exam rarely tests you on Classic anything. You need to know how to get from Windows XP Professional settings to Classic and back, but in 90% of the cases you're going to find instructions laid out in the Windows XP Professional vein. I will do my best to point out alternatives in the [NOTES FROM THE FIELD] section as I have done here.
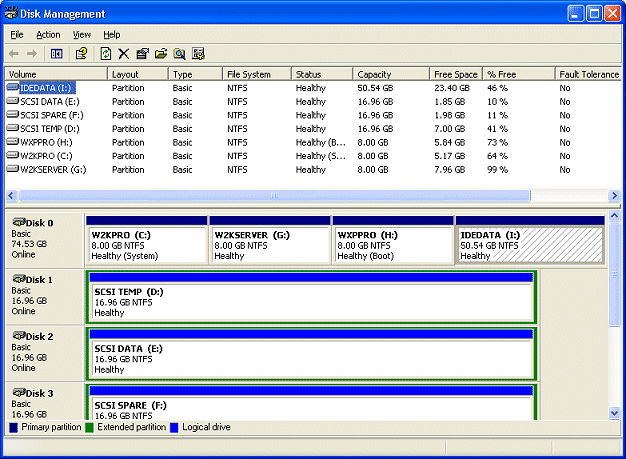
If you want to directly open the Disk Management MMC you can type diskmgmt.msc from the RUN box or from a command line. This will run the tool independently from the Computer Management MMC.
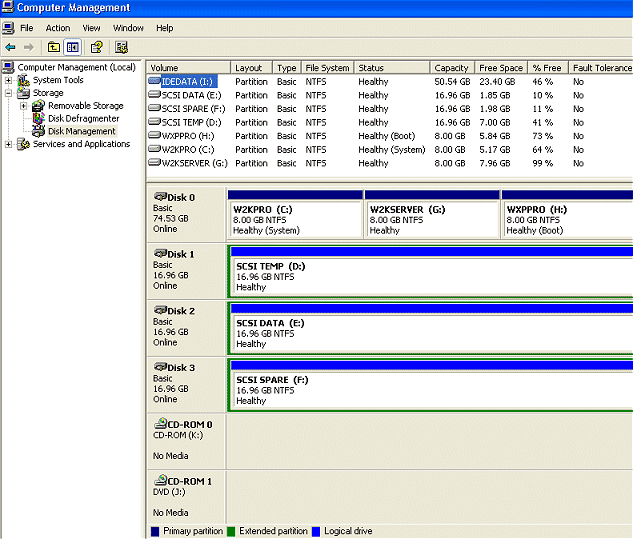
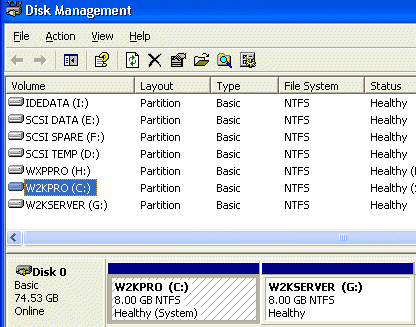
As you can see from the image above, we have a number of basic physical and logical drives on the system, as well as two CD-ROM drives (not shown in the above image).
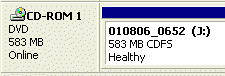
If there were removable drives on this system, such as Jaz or ORB drives and the like, they would appear here as well. The removable drives, as well as the CD-ROM drives, will either show "no media" when they are empty (or some error is preventing them from seeing inserted media) or the file system of the installed media.
(When I inserted a CD-ROM in my DVD drive, the Disk Management MMC automatically detected the change, refreshed it's view, and displayed the data. The Compact Disk File System (CDFS) is file system of the inserted disk and is displayed.)
When you select a drive in the upper window (which is currently set to the default Volume List View) by left clicking on it once, not only will it become highlighted (in blue), but it will also become shaded in the lower part of the window (which is currently set to the default Graphical List View).
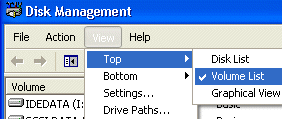
You can change the appearance of both the top and bottom window views by selecting VIEW from the menu and then selecting whichever (or both) views you wish to change. Top and Bottom, along with Settings and Drive Paths are controlled here.
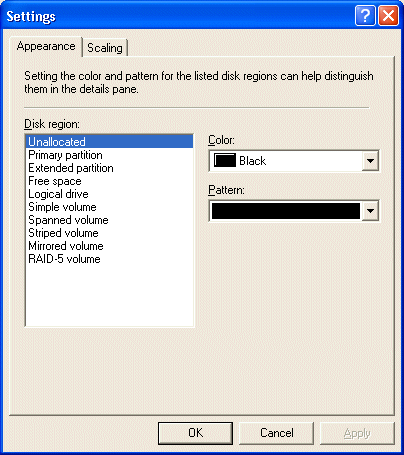
You can change the colors and wallpaper for volumes and disk regions by selecting VIEW and then SETTINGS. The APPEARANCE tab shows all of the current default colors for the available disk regions. Even disk regions that are not currently installed on the system are set with specific colors by default.
You can change how disk sizes are displayed on the SCALING tab. The default settings are shown below.
That's the five cent tour of the Disk Management MMC.
DiskPart
The command line tool, DiskPart, is available in Windows XP Professional, which allows the administrator to handle disk administrative tasks from a command prompt.
You start your session at the command prompt by typing the following:
H:\Documents and Settings\JZANDRI>diskpart
Microsoft DiskPart version 1.0
Copyright (C) 1999-2001 Microsoft Corporation.
On computer: P42GHZ
DISKPART>
This will put you into the DiskPart program session. If you needed to get a little more information on DiskPart before starting your session and tried the standard :\diskpart /?, this is all you would get:
H:\Documents and Settings\JZANDRI>diskpart /?
Microsoft DiskPart version 1.0
Copyright (C) 1999-2001 Microsoft Corporation.
On computer: P42GHZ
Microsoft DiskPart syntax:
diskpart [/s <script>] [/?]
/s <script> - Use a DiskPart script.
/? - Show this help screen.
However, if you started the program and then typed HELP, you'd get much more information:
H:\Documents and Settings\JZANDRI>diskpart
Microsoft DiskPart version 1.0
Copyright (C) 1999-2001 Microsoft Corporation.
On computer: P42GHZ
DISKPART> help
Microsoft DiskPart version 1.0
ADD - Add a mirror to a simple volume.
ACTIVE - Activates the current basic partition.
ASSIGN - Assign a drive letter or mount point to the selected volume.
BREAK - Break a mirror set.
CLEAN - Clear the configuration information, or all information, off the
disk.
CONVERT - Converts between different disk formats.
CREATE - Create a volume or partition.
DELETE - Delete an object.
DETAIL - Provide details about an object.
EXIT - Exit DiskPart
EXTEND - Extend a volume.
HELP - Prints a list of commands.
IMPORT - Imports a disk group.
LIST - Prints out a list of objects.
ONLINE - Online a disk that is currently marked as offline.
REM - Does nothing. Used to comment scripts.
REMOVE - Remove a drive letter or mount point assignment.
RESCAN - Rescan the computer looking for disks and volumes.
RETAIN - Place a retainer partition under a simple volume.
SELECT - Move the focus to an object.
DISKPART>
For the most part, this command line tool is highly effective when you are using any of the above commands via scripting. The only other time it is easy / necessary to use it, is from the Recovery Console, as it is one of the commands that are available from it.
[NOTES FROM THE FIELD] - Do not modify the structure of dynamic disks with the DiskPart command line tool because you might damage your partition table within the dynamic disk structure.
To exit the DiskPart program simply type EXIT at the program prompt.
The Diskpart Command Line Utility is available for download from Microsoft for Windows 2000 and it is part of the Windows 2000 Resource Kit Tools as well. (It is included as part of Windows XP Professional and Windows Server 2003.) As with any software available for use from any version of the Resource Kits or the download site, it is not supported under any Microsoft standard support program or service. You use it at your own peril.