Windows 7 has a new feature called VHD Boot. This feature allows you to boot your entire Windows from a Virtual Hard Disk (VHD) file. There are various advantages of this feature, like:
The configurations and settings of your entire system are included in one file .VHD file.
One VHD file can be based on another one. So if you have different systems, you can create a base copy of Windows 7 on a VHD and make all others incremental. This saves a lot of disk space.
But this feature can only be used on Windows 7, Windows Server 2008 R2, or later operating systems. The operating systems which came before Windows 7 do not support VHD. With VHD your system suffers a performance decrease of about 3%. Windows' hibernate function and BitLocker configurations are not supported by VHD. BitLocker can be used within the guest VHD, but not on the volume where the VHD resides. Also, with VHD, features like Aero dont work because the Windows Experience index is not supported.
Types of Virtual Hard Disks:
Three types of VHD files can be created using the disk management tools:
Fixed hard-disk image - A fixed hard-disk image is a file that is allocated to the size of the virtual disk. For example, if you create a virtual hard disk that is 2 gigabytes (GB) in size, the system will create a host file approximately 2 GB in size. Fixed hard-disk images are used for production servers and working with customer data.
Dynamic hard-disk image - A dynamic hard-disk image is a file that is as large as the actual data written to it. As more data is written, the file dynamically increases in size. For example, the size of a file backing a virtual 2 GB hard disk is initially around 2 megabytes (MB) on the host file system. As data is written to this image, it grows with a maximum size of 2 GB.
Dynamic hard-disk images are beneficial for development and testing environments. Dynamic VHD files are smaller, easier to copy, and expand after mounting.
Differencing hard-disk image - A differencing hard-disk image describes a modification of a parent image. This type of hard-disk image is not independent, and it depends on another hard-disk image to be fully functional. The parent hard-disk image can be any of the above mentioned hard-disk image types, including another differencing hard-disk image.
Creating a VHD:
Perform these steps to create a VHD file on your Windows 7-based computer:
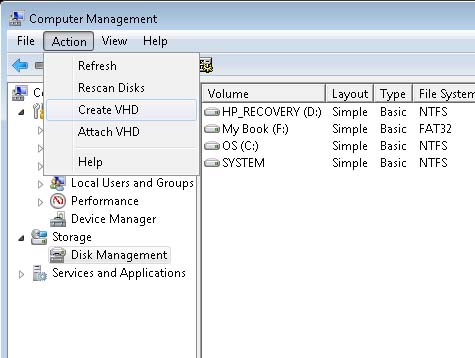
Click Start and then right-click Computer.
Click Manage, then in the left pane, right-click Disk Management, and then click Create VHD.
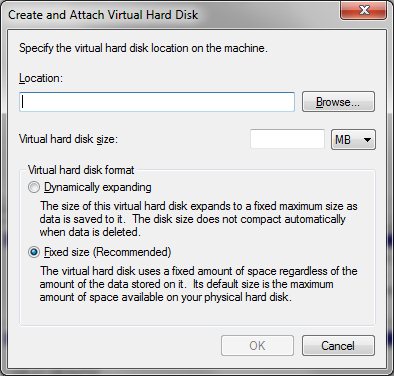
Select a location to save your VHD file. Select the maximum size for your VHD file. You can also choose from either of the two options Dynamically Expanding, where the size of the VHD expands dynamically to a fixed maximum size, or Fixed Size, where the virtual hard disk uses a fixed amount of space regardless of the size of data stored on it.
The new disk will show in the right pane as unallocated space. Right-click the new unallocated VHD Disk number and click Initialize Disk.
You need to choose if you want the new VHD to have Master Boot Record (MBR) or GUID Partition Table (GPT) partition, and click OK.
Right-click again on the new unallocated VHD and click New Simple Volume.
Type how much of the maximum disk space you want to use for this VHD partition, and click Next.
Select the file system for your VHD from either FAT or NTFS, and enter a name for your VHD. Select the Perform a quick format check box, and click Next.
Click Finish. The system creates a new simple volume on your VHD, which is already attached.
Installing a VHD-Boot Machine:
Perform these steps to install Windows 7 with VHD file:
Boot the system with a Windows 7 setup DVD or any other boot media.
On the setup screen, dont choose Install Now, but press Shift-F10 to get into command line mode.
Type diskpart on the command line mode to start the partitioning utility.
You need to create a new VHD file. Type the following command to create this file: create vdisk file=D:\pathToVhd.vhd type=expandable maximum=maxsizeInMegabyte
Select the new VHD and attach it as a physical disk. Use the following command to perform this task: select vdisk file=D:\pathToVhd.vhd
attach vdisk
Proceed with the normal setup and make sure that you install Windows on the correct disk. You may receive a warning Windows cannot install to this disk. Ignore this warning.
At next startup, youll see Windows 7 in the boot menu. If you want to add a VHD manually to the boot menu, use this command: bcdedit /copy {originalguid} /d "New Windows 7 Installation"
bcdedit /set {newguid} device vhd=[D:]\Image.vhd
bcdedit /set {newguid} osdevice vhd=[D:]\Image.vhd
bcdedit /set {newguid} detecthal on
Click Start, right-click Computer, and select Manage.
To attach an existing VHD File, in the left pane, right-click Disk Management and then click Attach VHD.
Click Browse, navigate to the VHD file location, select the file, and then click Open. If you want the VHD to be read-only, select the check box. Click OK.