Historically, when it came to Windows networks, there were 2 basic types to consider. Company networks typically have a server and a domain environment, while small office and home networks use a peer-to-peer type network called a workgroup in Windows. Windows 7 adds Homegroups to make workgroup sharing easier. Let's look at a description of each type:
Workgroups
All computers are peers which means no computer has control over another computer.
Each computer has a set of user accounts. To log on to any computer in the workgroup, you must have an account on that computer, or know the username and password of an account on that computer.
There are typically no more than twenty computers. 10 or less is ideal.
A workgroup is not protected by a password.
All computers must be on the same local network or subnet.
Management of user accounts, securing resources, and providing access to shared resources is very difficult with workgroups.
Homegroups
Computers on a home or small office network must belong to a workgroup, but they can also belong to a homegroup. A homegroup makes it easier to share documents and printers with peers.
A homegroup is protected with a password, but you only need to type the password once when adding a computer to the homegroup.
Domains
Must have at least 1 server. Network administrators use servers to control the security and permissions for all computers on the domain. Domain users must provide a password or other credentials each time they access the domain.
If you have a user account on the domain, you can log on to any computer on the domain without needing a local account on that computer.
There can be thousands of client computers in a domain.
The computers can be on different local networks.
Domain users can join an existing Homegroup, but cannot create one.
When setting up your computer on a network in the Network and Sharing Center, you will choose whether your computer is part of a workgroup or a domain. Homegroups are configured here after joining a network.
Homegroups:
HomeGroup is a feature of Windows 7, and Home Premium or better is required to create a HomeGroup, however, all versions of Windows 7 can join one. To create a Homegroup, follow these steps:
From the Network and Sharing Center, click Choose homegroup and sharing options.
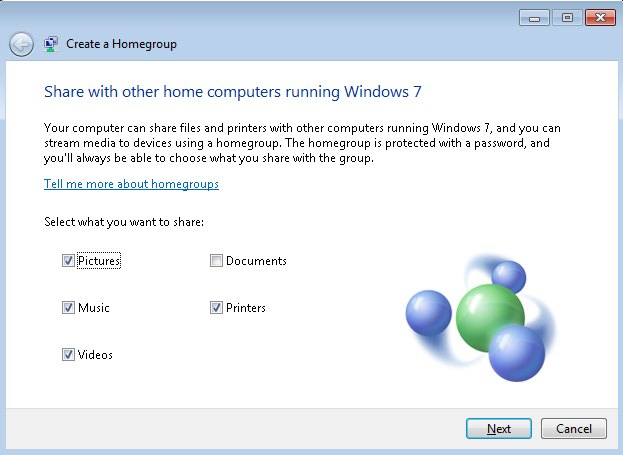
Click Create a homegroup. Select the items you wish to share and click Next.
On the next screen, Windows will assign a password to your homegroup which can be changed later. Write down the password which will be needed by others whom you want to allow access to your group. Click Finish.
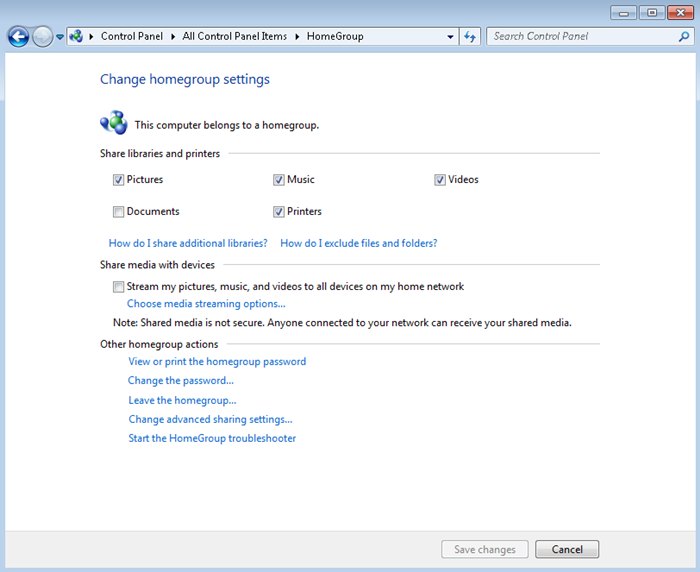
After completing the wizard, you will see the Change homegroup settings window. Here you can change the types of files that are shared, change the password, allow streaming of shared media, leave the homegroup, and modify advanced settings.
Clicking on Change advanced sharing settings will bring up the screen below. Here you can customize sharing settings for each network profile. This screen can also be reached by clicking on the Change advanced sharing settings link in the left pane of the Network and Sharing Center.
Joining a homegroup is simple. From the Network and Sharing Center, click on the Homegroup link in the lower left pane. On the next screen, any available homegroups on your networks will show and you can click the join now button. You must have the homegroup's password to join and your computer's network location must be set to Home.
In some cases, you might want to prevent access to certain files or folders within your shared Libraries or share folders outside of your Libraries. To do that, right-click the folder, and then do one of the following:
To share the folder with nobody, click Share with, and then click Nobody.
To share the file or folder with specific people, click Share with in the toolbar, click Specific people, select each person with whom you want to share with the file or folder, and then click Add. Click Share to close the File Sharing dialog box. Sharing with specific people only works if theyve linked their profiles to an online ID.
To share the file or folder with the entire homegroup, click Share with in the toolbar, and then click either HomeGroup (Read) or HomeGroup (Read/Write).
Shared Folders:
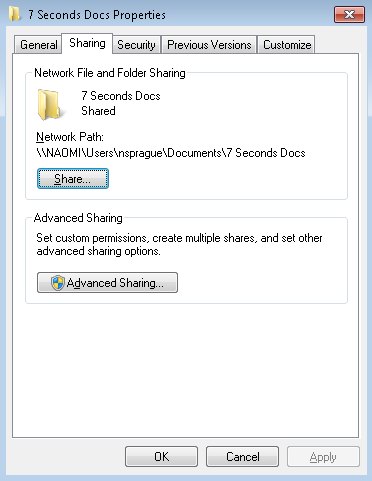
Shared folders allow you to share data stored on your computer with other users on your network. You can share individual folders by right-clicking the folder you wish to share, choosing Properties, and then clicking the Share tab of the folders properties.
This window provides two different sharing options: Share and Advanced Sharing. You can use shared folders when you cannot use HomeGroups, such as when you want to share resources on a Work network.
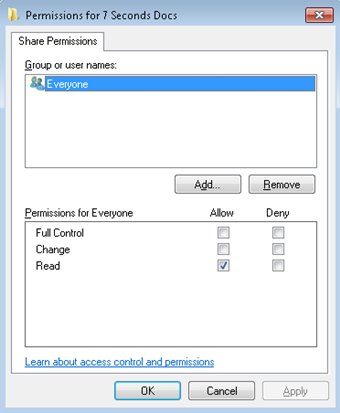
Clicking Share brings up the File Sharing dialogue box. You can use this window to set share permissions for local user accounts, the Everyone group, or the HomeGroup.
If you click Advanced Sharing, you can specify the name of the shared folder. A shared folder can be shared several times with different share names and permissions. To configure the permissions for the Shared folder, click the Permissions button.
But before you can configure the permissions, you must first understand how they work. This will be covered in the "Configure file and folder access" section of the guide.
Managing Shares:
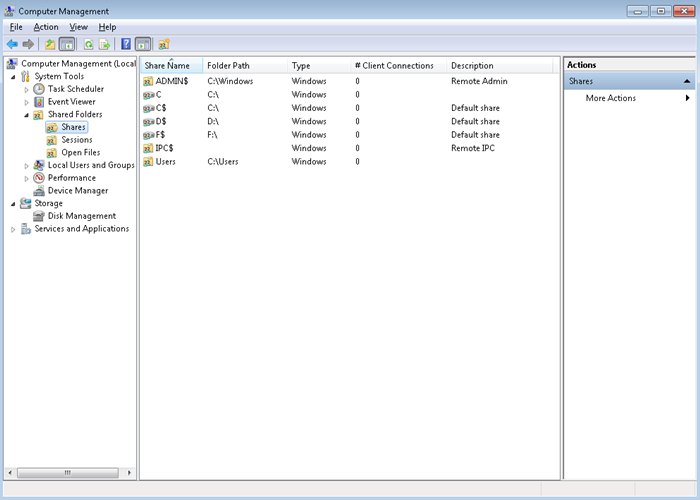
You can manage all shared folders on a client running Windows 7 centrally using the Shared Folders node of the Computer Management console. The Shares node, shown below, displays all shared folders on the computer. The Sessions node provides details on which remote users currently are connected to shared folders, where they are connecting from and how long they have been connected. The Open Files node displays the folders and files that remote users are accessing. You can edit the properties of an existing share by right-clicking it within this console and selecting properties. You can create a shared folder by right-clicking the Shares node and then clicking New Share. This starts the Create a Shared Folder Wizard.
Sharing Printers:
You can connect a print device (printer, plotter, copy machine, or similar device) directly to your Windows 7 computer such as with a USB connection, or indirectly through a network. You can then print to the printer from the locally connected computer, or you can share the printer so that other users and network applications can print to the printer over the network. When setting up the printer, you will add either a local printer or a network printer depending on which of the scenarios above applies.
If you wish to share a printer, follow these steps:
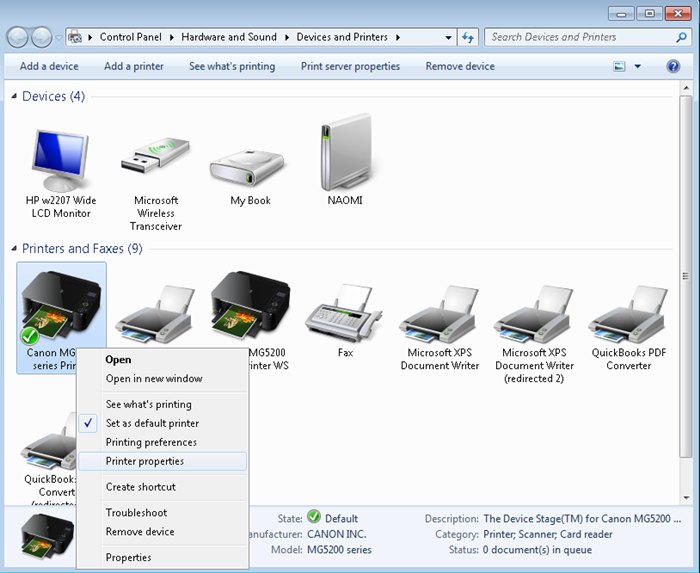
Click Start and select Devices and Printers.
Right click on the printer you wish to share and select Printer Properties.
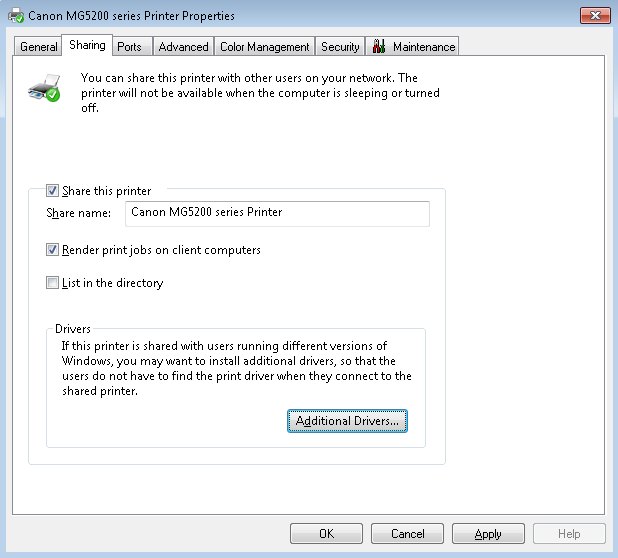
Next, click on the Sharing tab and check the Share this Printer checkbox. You can name the share so that others can easily find it. If you are in a domain environment, you can also publish the printer in Active Directory if you choose the List in the directory option. Click on the Additional Drivers button to see which drivers are installed. If the users who will be connecting to this printer are using a different operating system, you can check the box next to the driver for their OS so they do not have to find and install the driver when they connect. If the driver does not show here, you can download additional drivers from the manufacturer or get them off the installation disk that came with the printer.
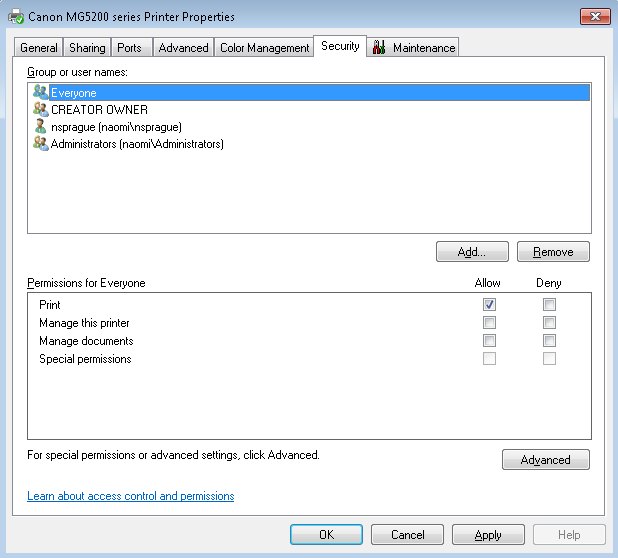
To set permissions for the printer, click on the Security tab.
When you share a printer, the Everyone group is assigned the Print permission by default, as shown in Figure 8-16. This means that all members of the HomeGroup or any user that is a member of the domain in a domain environment can send print jobs to the printer. If several people use the printer, you may wish to assign one of the other available permissions to allow better printer management. The available permissions are:
Print - This permission allows a user to print to the printer and rearrange their own documents that have been submitted to the printer.
Manage This Printer - Users with this permission can pause and restart the printer, change spooler settings, adjust printer permissions, change printer properties, and share a printer.
Manage Documents - This permission allows users or groups to pause, resume, restart, cancel, or reorder the documents submitted by users that are currently in the print queue.
You can connect to a shared printer by going to the Devices and Printers control panel and clicking Add a Printer. Select Add a network, wireless or Bluetooth printer. A window comes up showing the available printers on the network. Note that if the printer or the computer it is connected to is turned off or sleeping, the printer will not show in the list. If the printer you wish to connect to is not on the list, click The printer I want isn't listed. Here you can browse the network for the printer, enter the share name and path to connect, or enter an IP address or hostname if you have that information.
Note that printers can also be shared using Homegroups.