Note: This section should probably be read before the previous one, "Configure IP4 and IP6 Network Settings", however, this is how Microsoft listed their exam objectives. Furthermore, since most of the information about setting up networks in Windows 7 was covered in the previous section, this section will mostly focus on wireless networking.
Network Types:
There are 2 basic types of networks, Wide Area Networks (WANs) and Local Area Networks (LANs). Most LANs are confined to a single building or group of buildings. However, one LAN can be connected to other LANs over nearly any distance via telephone lines (DSL/ISDN), coaxial cable, fiber, wi-fi, etc. A system of LANs connected in this way is a WAN. Although we will be focusing on LANs in the guide, the figures below illustrate the difference between the 2 types of networks.
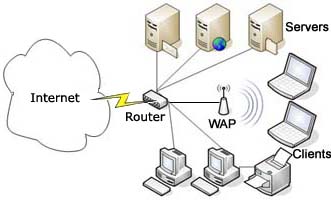
Local Area Network (LAN)
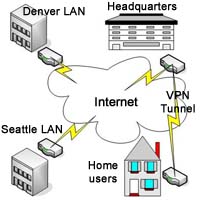
Wide Area Network (WAN)
Note that the LAN image shows a hybrid network consisting of wired and wireless connections. Also note that on smaller LANs, the wireless access point (WAP) and router are often the same device.
Introduction to Wireless Networks:
Wireless networks allow computers to comunicate without the use of cables using IEEE 802.11 standards, also known as Wi-Fi. A connection is made from a device, which is usually a PC or a Laptop with a wireless network interface card (NIC), and a Wireless Access Point (WAP), which acts as a bridge between the wireless stations and Distribution System (DS) or wired networks. An 802.11 wireless network adapter can operate in two modes, Ad-Hoc and Infrastructure. In infrastructure mode, all your traffic passes through the WAP. In Ad-hoc mode your computers talk directly to each other and do not need an access point. The table below shows the various standards.
Standard
Speed
Distance
Frequency
802.11a
54 mbps
100 ft
5 GHz
802.11b
11 mbps
300 ft
2.4 GHz
802.11g
54 mbps
300 ft
2.4 GHz
802.11n
540 mbps
600 ft
5 GHz and/or 2.4 GHz
Wireless Authentication and Encryption:
By default, wireless signals can be intercepted and captured by anyone within range of the WAP which is a huge security concern. For that reason, it is always recommended that you use some form of encryption. Below is a list of common encryption types:
WEP - Wired Equivalent Privacy is a security encryption algorithm that is easily cracked. For this reason, it has been replaced by other technologies.
TKIP - Temporal Key Integrity Protocol was designed as a solution to replace WEP without requiring the replacement of legacy hardware. TKIP suffered from similar flaws as WEP and has been replaced by more secure encryption schemes.
RADIUS - Remote Authentication Dial In User Service (RADIUS) is a networking protocol that provides centralized Authentication, Authorization, and Accounting (AAA) management for computers to connect and use a network service. RADIUS is often used by ISPs and enterprises to manage access to the Internet or internal networks, and wireless networks. Microsoft's answer to corporate wireless security is the use of RADIUS authentication through its Internet Authentication Services (IAS) product.
WPA - The original WPA standard used TKIP, but was later replaced by WPA2 which uses a more secure AES-based algorithm. WPA uses a 256 bit key to encrypt data. This key may be entered either as a string of 64 hexadecimal digits, or as a passphrase of 8 to 63 characters. It is susceptible to brute force attacks when a weak passphrase is used. In most cases, WPA2 is the recommended option to use.
It is also important to change the default username and password on your wireless access point/router.
Setting Up a Wireless Network:
Once your wireless access point is properly configured, you can follow these steps to set up your wireless network in Windows:
Open Network and Sharing Center by clicking the Start button , and then clicking Control Panel. In the search box, type network, and then click Network and Sharing Center.
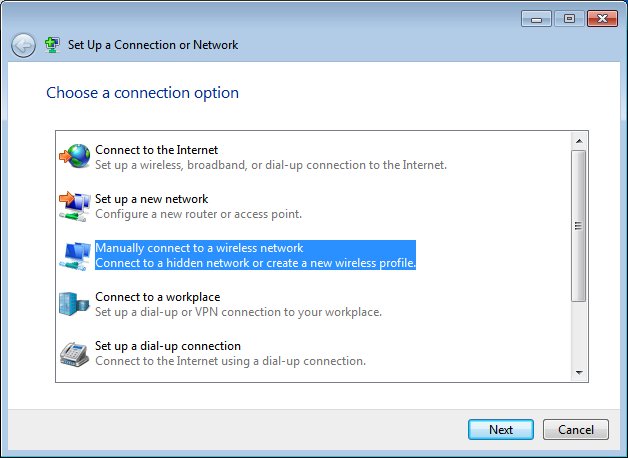
Click Set up a new connection or network.
Click Set up a new network, and then click Next.
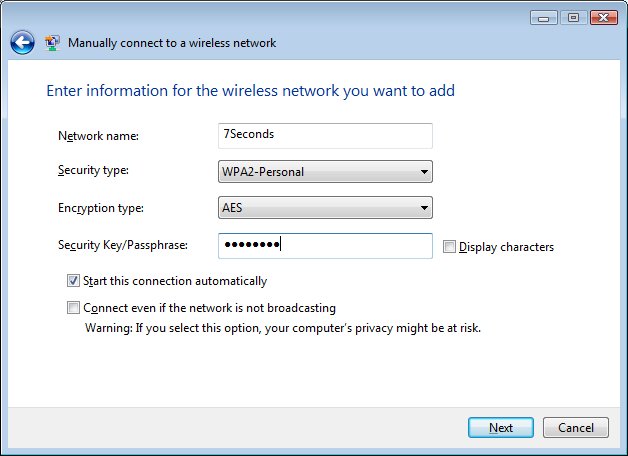
The wizard will walk you through creating a network name and entering the security key you configured on the WAP. The network name is the SSID that you entered when configuring your access point. Make sure that this SSID is unique or your computer could end up trying to switch back and forth between the connections and cause connectivity problems.
Note that if you are using a laptop, you need to make sure the wireless switch on the computer is turned on.
If you have multiple computers that need to be configured to connect to a wireless network, you can use a USB flash drive to set up the connection on other computers. To save your wireless network settings to a USB flash drive, insert a USB flash drive into the computer, and then follow these instructions:
Open the Network and Sharing Center.
In the left pane, click Manage wireless networks.
Right-click the network and then click Properties.
Click Copy this network profile to a USB flash drive.
Select the USB device and then click Next.
When the wizard is complete, click the Close button.
Now take the USB drive to a destination computer and do the following:
Plug the USB flash drive into a USB port on another computer.
For a computer running Windows 7, in the AutoPlay dialog box, click Connect to a Wireless Network.
When asked if you want to add the network, click the Yes button.
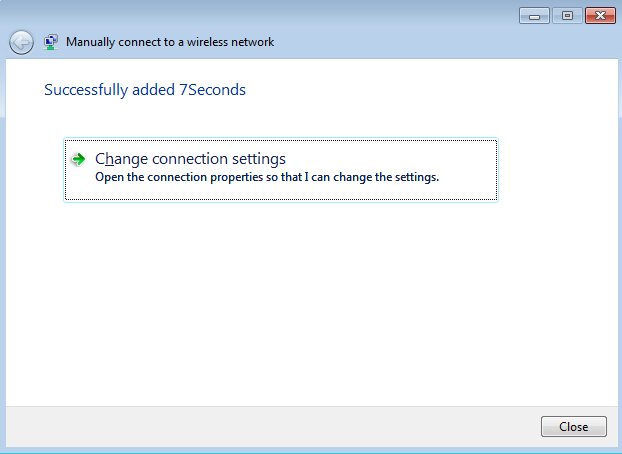
After you get the successful configuration message, click the OK.
Setting Preferred Wireless Networks:
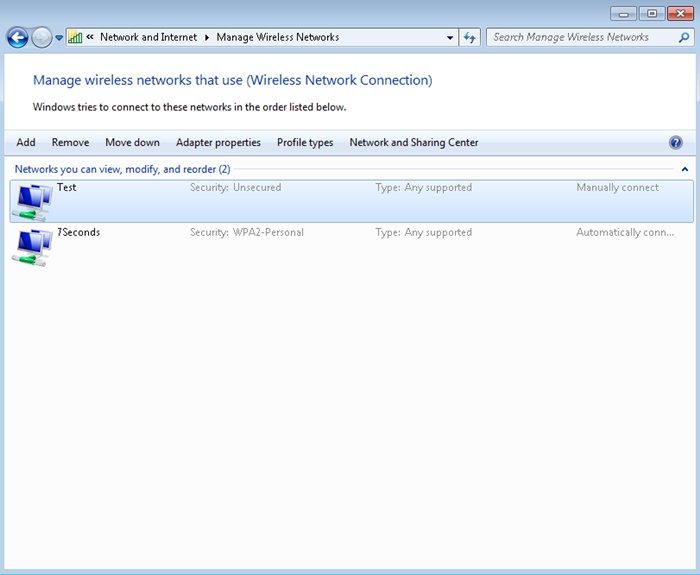
If your computer continously attempts to connect to a different wireless network than you would like, you can change the order of your preferred wireless networks as follows:
Open the Network and Sharing Center.
Click Manage wireless networks.
Here you can click on a network and then move it up or down. You can also add and remove connections from this window.
Setting Up an Ad Hoc Wireless Network:
You can set up a temporary wireless network, or ad hoc network, between two or more computers running Windows 7 (or between computers running Windows 7 and Windows Vista) provided they are all within 30 feet of each other. An access point is not required to set up an ad hoc network. This enables users to share folders and other resources without needing to connect to an organizational network.
To set up an ad hoc connection, on the first computer on the network, open Network And Sharing Center and click Set Up A New Connection Or Network. Select Set Up A Wireless Ad
Hoc (Computer To Computer) Network. You give the network a name and (if you want) set up a security key so that users joining the network need to supply a password. Other users join the ad hoc network as they would any other wireless network. You can choose to save the network settings if you want to set up an ad hoc network with the same configuration sometime in the future Ad hoc networks use IPv6 and do not require IPv4 connectivity.
Connecting to a Wireless Network:
After setting up a wireless connection for the first time as illustrated in the instructions above, Windows connects to the network automatically if you checked the Start this connection automatically checkbox. If you want to connect to another wireless network (such as at an internet cafe, for example), you can click the network icon on your toolbar at the bottom right section of your screen. This displays all wireless networks within range, and you can double-click the network to which you want to connect. Alternatively, you can open Network And Sharing Center and click Connect To A Network. To view and change your connection status, you can click Connect or Disconnect beside View Your Active Networks in Network And Sharing Center. This again presents you with a list of the wireless networks within range.
Location Aware Printing:
Location Aware Printing allows you to choose different default printers for different networks. This capability is useful for people who use one laptop in multiple locationsfor example, at work and at home. This feature is only available on laptops and other portable devices that use a battery and are running Windows 7 Professional or higher. This can be configured using the following instructions:
Click the Start button, and then click Devices and Printers.
Under Printers and Faxes, select a printer by clicking on it.
In the menu bar, click Manage Default Printers.
In the Manage Default Printers dialog box, click Change my default printer when I change networks, specify which printer should be the default for each network, and then click OK.
In the Select network list, select a network.
In the Select printer list, click a printer to use as the default printer for that network and click Add.