Windows 7 workstations can be configured as a member of a workgroup or as a member of a domain. When a workstation is configured in a workgroup, user access and security are configured on the workstation itself. Each computer maintains its own security database, which includes its own local user accounts and user groups. If a user on one computer needs to access resources on other computers, a user account has to be created on each computer, or they have to login with an existing account on that computer. The user and group information is not shared with other computers. By default, if the computer is not part of a domain, local users are created without passwords.
A domain, on the other hand, uses one database known as Active Directory, which is stored on one or more domain controller servers. This provides the ability to share its common security and user and group account information for all computers within the domain. When a user logs onto the domain, they can access resources throughout the domain with the same logon (single sign-on). The domain allows for centralized network administration of all users, groups, and resources on the network. A user account enables a user to log on to a computer or domain with an identity that can be authenticated and authorized for access to the resources of the computer or domain. Because the user account is meant to be assigned to one and only one user, it enables you to assign rights and permissions to a single user and gives you the ability to track what users are doing.
When you install Windows 7, the operating system installs default user accounts which are managed using the User Accounts control panel.
Administrator - The Administrator account is a predefined account that provides complete access to files, directories, services, and other facilities on the computer. You cannot delete this account. The built-in administrator account is disabled by default in Windows 7 on new installations. If Windows 7 determines during an upgrade from Windows Vista that the built-in administrator is the only active local administrator account, Windows 7 leaves the account enabled and places the account in Admin Approval Mode. The built-in administrator by default, cannot log on to the computer in safe mode.
Guest - The Guest account is designed for users who need one-time or occasional access. Although guests have only limited system privileges, you should be very careful about using this account because it opens the system to potential security problems. The risk is so great that the account is initially disabled when you install Windows 7.
When you create additional accounts, you can choose between two options:
Standard user
Administrator
These account types give the user a different level of control. A standard user account lets a person use most of the capabilities of the computer, but permission from an administrator is required if you want to make changes that affect other users or the security of the computer. You can use most programs that are installed on the computer, but you cant install or uninstall software and hardware, delete files that are required for the computer to work (i.e. system files), or change settings on the computer that affect other users.
The administrator account provides the most control over the computer, and should be used only when necessary. The administrator account lets you make changes that affect other users. Administrators can change security settings, install software and hardware, and access all files on the computer. Administrators can also make changes to other local user accounts.
When you set up Windows, you are required to create an administrator account that allows you to set up your computer and install any programs that you want to use. After you have finished setting up your computer, it is recommended for security reasons to create a standard account for regular use.
User Groups:
The Windows 7 built-in groups that you can add users to in order to assign them rights are as follows:
Administrators - Members of this group have unrestricted access to the client.
Backup Operators - Members of this group are able to override file and folder access restrictions for the purpose of backing up data.
Cryptographic Operators - Members of this group are able to perform cryptographic operations. This policy is used only when Windows 7 is deployed in a special configuration called common criteria mode. In this mode administrators are able to read and write all settings except those related to the cryptography of IPsec policy.
Distributed COM Users - Members of this group are able to manipulate Distributed COM objects on this computer.
Event Log Readers - Members of this group can read data stored in the event logs.
Network Configuration Operators - Members of this group can change Transmission Control Protocol/Internet Protocol (TCP/IP) address settings.
Performance Log Users - These users can schedule the logging of performance counters, enable trace providers, and collect event traces.
Performance Monitor Users - These users can access performance counter data locally and remotely.
Power Users - This group is included for backward compatibility.
Remote Desktop Users - Members of this group are able to log on remotely through remote desktop.
Replicator - This group is used to support file replication in domain environment.
Configuring Authentication:
User authentication is a method of identifying the user and verifying that the user is allowed to access some restricted service. After the user has been established as authenticated user, users authorization determine the users rights to access resources in different modes, depending on the user rights assigned to that user. For example, depending on the user authorization a user can access a file, a folder, a service or an application with full rights or partial rights.
Configuring authentication methods:
Click Start and type Firewall in the search box.
Select Windows Firewall with Advanced Security from the search results.
On Windows Firewall with Advanced Security page, click Windows Firewall Properties.
On the IPsec Settings tab, click Customize.
In the Authentication Method section, select the type of authentication which you want to use From the given list:
Default - This option enables the authentication method currently defined by the local administrator in Windows Firewall with Advanced Security or by Group Policy as the default.
Computer and User using KerberosV5 - This option configures your computer to use and require authentication of both the computer and the currently logged-on user by using their domain credentials. This authentication method can work only with other computers that can use Authenticated IP (AuthIP), including Windows 7, Windows Vista, Windows Server 2008, and Windows Server 2008 R2. User-based authentication using Kerberos V5 isnt supported by IKE v1.
Computer (using Kerberos V5) - This option configures your computer to use and require authentication of the computer by using its domain credentials. This option works with other computers that can use IKE v1, and also supports earlier versions of Windows.
User (using Kerberos V5) - This option configures your computer to use and require authentication of the currently logged-on user by using his or her domain credentials. This authentication method works only with other computers that are capable of using AuthIP, including Windows 7, Windows Vista, Windows Server 2008, and Windows Server 2008 R2. User-based authentication using Kerberos V5 isnt supported by IKE v1.
Computer certificate from this certification authority - This option requires you to enter the identification of a certification authority (CA), and configures the computer to use and require authentication by using a certificate which is issued by the selected CA. You can also select Accept only health certificates, then only certificates that include the system health authentication enhanced key usage (EKU) provided in a Network Access Protection (NAP) infrastructure can be used for this rule.
Advanced - You can click Customize to specify a custom combination of authentication methods. You can specify a combination of both a First authentication method and a Second authentication method. The first authentication method can be one of the following:
Computer (Kerberos V5) - This option configures your computer to use and require authentication of the computer by using its domain credentials. This option works with other computers that can use IKE v1, and also supports earlier versions of Windows.
Computer (NTLMv2) - This option configures your computer to use and require authentication of the computer by using its domain credentials. This option works only with other computers that are capable of using AuthIP, including Windows 7, Windows Vista, Windows Server 2008, and Windows Server 2008. IKE v1 does not support user-based authentication using Kerberos V5.
Computer certificate from this certification authority (CA) - This option requires you to enter the identification of a certification authority (CA), and configures the computer to use and require authentication by using a certificate which is issued by the selected CA. You can also select Accept only health certificates, and then certificates issued by a NAP server can be used.
Preshared key (not recommended) - This method requires you to enter a preshared key which configures your computer to authenticate by exchanging the preshared keys. The authentication succeeds only if they match. This method is not recommended by microsoft, and is included only for backward compatibility and testing purposes.
When you select First authentication is optional, then the connection can succeed even if the authentication attempt specified in this column fails.
The second authentication method can be one of the following:
User (Kerberos V5)
User (NTLMv2)
User health certificate from this certification authority (CA) - This option requires you to enter the identification of a CA and configures your computer to use and require user-based authentication by using a certificate which is issued by the specified CA. You can also select Enable certificate to account mapping, which enables certificate association with a user in Active Directory for the purpose of granting or denying the access to specified users or user groups.
Computer health certificate from this certification authority (CA) - This option requires you to enter the identification of a certification authority (CA), and configures the computer to use and require authentication by using a certificate which is issued by the selected CA. You can also select Accept only health certificates, then only certificates that include the system health authentication enhanced key usage (EKU) provided in a Network Access Protection (NAP) infrastructure can be used for this rule.
Click OK on dialog boxes to save your changes and return to the Group Policy Management Editor.
Multifactor Authentication:
Multi-Factor Authentication (MFA) is an additional layer of security that offers enhanced control over your AWS Account settings and the AWS services and resources that have been subscribed for your account. It is an optional feature that requires a valid six-digit, single-use code from an authentication device, in addition to your standard AWS credentials, before access is granted.
MFA uses an authentication device that generates random, six-digit authentication codes continuously. Once you enable AWS MFA, whenever somebody tries to sign in to AWS to access your AWS Account settings on the AWS Portal or to use the AWS Management Console to access the AWS services and resources that are subscribed to your account, access is granted only after the correct user name and password and the precise code from your authentication device are provided. This multi-factor authentication provides even greater protection for your AWS Account settings and the AWS services and resources that are subscribed to your account, including extra protection of sensitive information such as your AWS access identifiers and critical actions like changing your AWS infrastructure service subscriptions.
Smart Cards with PIV:
Windows 7 provides support for smart cardrelated Plug and Play and the Personal Identity Verification (PIV).It implies that users of Windows 7 can use smart cards from vendors who have published their drivers through Windows Update without needing special middlewares. These drivers can be downloaded in the similar way as drivers for other devices in Windows. When a PIV-compliant smart card is inserted into a smart card reader, Windows tries to download the driver from Windows Update. If an appropriate driver is not accessed through Windows Update, a PIV-compliant minidriver that is included with Windows 7 operating system is used for the card.
Network administrators, who want to enhance the security of the organization's portable computers used by remote users, can use this service. It has very simplified deployment made possible by smart card Plug and Play PIV support. Users can use smart cards to perform critical business tasks in a secure manner.
The smart card with PIV in Windows 7 have following features:
Encrypting drives with BitLocker Drive Encryption - In the Windows 7 operating system, users can choose to encrypt their removable media with BitLocker and then they can use the smart cards to unlock the drive. Windows can retrieve the correct minidriver for the smart card and allows the operation to complete.
Smart card domain logon using the PKINIT protocol - In Windows 7, the appropriate minidriver for a smart card is retrieved automatically, enabling a new smart card to authenticate to the domain without requiring the user to install or configure additional middleware or drivers.
E-mail and Document signing - Windows 7 users can retrieve the correct minidriver for a smart card at run time automatically to sign an e-mail or document. XML Paper Specification (XPS) documents can also be signed without the need for additional software.
Use with business applications - In Windows 7, any application that uses Cryptography Next Generation (CNG) or CryptoAPI to enable the applications to use certificates can use Windows to retrieve the correct minidriver for a smart card at run time so that no additional middleware is required.
Credential Manager in Windows 7:
Credential Manager allows you to store credentials, such as user names and passwords that are used to log on to websites or on other computers on the network. When you store your credentials, Windows automatically logs you on to websites or other computers. Credentials are saved in vaults by Windows. Follow these steps to manage your credentials in windows 7:
Click the Start and then click Control Panel.
Type Credential manager in the Control Panels search Window, then click Credential Manager from the search window.
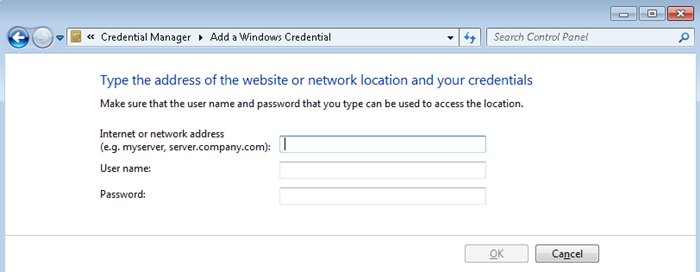
Click on Add a Windows credential. In the Resource box, type the URL of the website or the name of the computer on the network or that you want to access. Next, type the user name and password that you want to use for that computer or website, and then click OK. You can also perform actions like Edit/Remove the credential from the vault at any time.
To add a certificate based credential, follow these steps:
Open the Credential Manager by following the steps above.
Click Add a certificate-based credential and then click Open the Certificate Manager to view the Current User Certificates.
Enter the internet or network address, then click Select Certificate, and then click OK.
Windows Vault contains credentials for websites and programs. It can be backed up by following these steps:
Open the Credential Manager in the control panel.
Click Back up vault to make a backup of all the stored credentials.
Browse to the location to store Windows Vault backup and then click Next. Press CTRL+ALT+DELETE to continue your backup.
Provide a password to protect the backup file. Type the Password in the box and Click Next.
To restore the vault, follow these steps:
Open the Credential Manager in the control panel.
Click the Restore Vault link in the Credential Manager window.
Browse to the location for the Backup vault file to restore then click Next.
Press CTRL+ALT+DELETE to continue restoring your logon credentials.
Enter the password for the backup file in the box and click Next.
Click Finish.
Although Credential Manager can be used to back up some forms of digital certificates, it cannot be used to back up and restore the self-signed Encrypting File System (EFS) certificates