Hard Drives Hard drives are magnetic storage devices that contain several discs inside called "Platters" that are attached to a spindle motor. The number of platters varies depending on the capacity of the drive. Platters are coated with a film of magnetically sensitive substance that is primarily made of iron oxide. Another important ingredient is a thin layer of cobalt alloy. The read/write heads are responsible for reading and writing to the platters and are attached to the head actuator which is in charge of moving the heads around the platters.
The voice coil actuator is found in modern drives and assures that the heads are in proper position which ensures that the appropriate tracks are read. The guidance system used by the heads is called a servo. Its job is to position the head over the correct cylinder. The spindle motor is responsible for spinning the platters at a rate ranging from 3600 RPM to 10000 RPM depending on the drive. Heads typically have a coil of copper wire inside. Currents are passed through the wires which causes the surface underneath to become magnetized, creating 1 bit of data. The direction of the current passing through the wiring dictates the polarity of the magnetization, which creates a 0 or a 1. To read the data, the drive's electronics detect polarity differences.
The disk's surface has tracks that are rings that are located next to each other. Each platter has the same number of tracks, and the tracks on the outside are larger than the tracks on the inner part of the surface. A track location that cuts across all platters is called a cylinder. Each cylinder is divided into sectors that are 512K in size. The size of the sector determines the amount of data that can be written, and the amount that will be wasted if only a few characters are in a record. A one byte record written to a sector occupies the entire track in that sector.
Hard drive performance is measured as follows:
Access Time - This is a measure of the average time that it takes the drives R/W heads to access data on the drive.
Seek Time - This is the amount of time it takes for the drives head to move between cylinders and land on a particular track.
Data Transfer Rate - The megabytes per second(MBps) in which data is transferred between the drive and the system.
There are several different type of interfaces that can be used including IDE, EIDE and SCSI. Each IDE interface can support up to 2 devices. IDE devices each contain their own integrated controllers, and so in order to maintain order on the channel, it is necessary to have some way of differentiating between the two devices. This is assigning each device either a master slave designation using jumpers on the drive, and then having the controller address commands and data to either one or the other. Another option is to set the jumpers to cable select. This means that the position of the drive on the cable will determine its status. If you are using two drives on a single channel, it is important to ensure that they are jumpered correctly. Making both drives the master, or both the slave, will most likely cause problems.
CompTIA uses the terms ATA, IDE and EIDE interchangeably to refer to all non-SCSI devices. IDE Drives come in 2 types:
Parallel ATA - The older, but still widely used variety, that uses a 40-pin cable to connect to devices.
Serial ATA - A newer specification that offers a number of benefits including: Faster throughput, thinner 7-pin cable that promotes better airflow through the case, support for longer cables (nearly 40 inches long), and hot-swappable. In addition, there are no jumpers to worry about because each device connects to its own controller channel. There are 2 varieties of SATA. The 1.5Gb type has a throughput of 150MBps and the 3Gb type (sometimes called SATA II) runs at 300MBps. eSATA makes the SATA bus available for external devices.
PIO and DMA are 2 different transfer modes and protocols that are used by hard drives to access the computer. Details of each are provided below:
PIO Mode - The Programmed I/O (PIO) mode is the older of the 2 methods for transferring data. This method uses the CPU to control the transfer of data between the system and hard drive. There are several different PIO modes that offer different speeds. These are shown in the table below:
PIO Mode
Transfer Rate (MBps)
0
3.3
1
5.2
2
8.3
3
11.1
4
16.6
DMA Mode - Direct Memory Access mode allows devices to transfer data to and from memory without using the CPU which reduces the overhead. PCI controllers use bus mastering to accomplish direct memory access. Below are tables which show the different DMA modes and their transfer rates:
DMA Mode Single Word (16-bit)
Transfer Rate (MBps)
0
2.1
1
4.2
2
8.3
DMA Mode Double Word (32-bit)
Transfer Rate (MBps)
0
4.2
1
13.3
2
16.7
Ultra DMA - The maximum speed of multiword DMA mode 2 was 16.7 MB/s. As faster and faster hard drives were created the new Ultra DMA specification was needed. The table below shows the transfer rates:
Ultra DMA Mode
Transfer Rate (MBps)
0
16.7
1
25
2
33
3
44.4
4
66.7
5
100
6
133
Drives that use Ultra DMA are typically referred to as "Ultra ATA/xx" where "xx" is the speed of the interface. For example, a drive that uses Ultra DMA mode 5 is referred to as ATA/100 because its throughput is 100 MBps.
Note: Both the hard disk, the system chipset and BIOS must support the mode in question.
RAID
Hard drives can be configured in a Redundant Array of Inexpensive Drives(RAID) configuration that is used for a variety of purposes including data recovery and increased read/write performance depending on the level of RAID employed. The RAID levels are as follows:
RAID Level 0
Disk striping will distribute data across 2-32 hard disks. This provides the fastest read/write performance as the system can access the data from more than one place. This level of RAID does not provide any redundancy.
RAID Level 1
Disk mirroring writes exact copies of data to more than one disk. Each disk or partition of a disk will contain the exact same data. If one hard disk fails, the data still exists on the other disk. This level of RAID also increases disk read performance as it can pull the data off of both disks.
RAID Level 2
Uses Hamming error correction codes, is intended for use with drives which do not have built-in error detection. All SCSI drives support built-in error detection, so this level is of little use when using SCSI drives. It is seldom used at all today since ECC is embedded in almost all modern disk drives.
RAID Level 3
Stripes data at a byte level across several drives, with parity stored on one drive. It is otherwise similar to level 4. It can be used in data intensive or single-user environments which access long sequential records to speed up data transfer. However, RAID-3 does not allow multiple I/O operations to be overlapped and requires synchronized-spindle drives in order to avoid performance degradation with short records.
RAID Level 4
Disk Striping in which the parity information is written to 1 drive at a block level. The parity information allows recovery from the failure of any single drive. The performance of a level 4 array is very good for reads(the same as level 0). Writes require that parity data be updated each time. The process offers no advantages over RAID-5 and does not support multiple simultaneous write operations.
RAID Level 5
Very similar to RAID level 4, however, parity information is written to each of the disks in the array. If one of the disks fails, the data can be reconstructed by installing a working hard disk. The parity information is used to reconstruct the data that was lost.
Hard Drive Installation
The following procedure outlines the physical installation of a typical hard drive.
Disconnect the power to the computer
Configure the appropriate master/slave settings or SCSI ID for the drive
Insert the drive into an available drive bay. If the drive is too small for the bay, you will need a mounting kit
Screw in the 4 screws - 2 on each side of the bay
If the drive is an IDE disk, connect the IDE cable to the drive. There should be a stripe along 1 edge of the cable. This stripe denotes pin 1. Pin 1 on the drive is usually closest to the power connector on the drive, however, you should consult the manufacturers documentation. Then connect the signal cable to the motherboard ID1 or ID2 interface making sure to note the pin 1 orientation there as well. If the drive is a SCSI drive, a SCSI cable would be connected from the drive to a SCSI controller card.
Connect one of the power supply's power connectors to the drive
In the old days, we had to launch CMOS and enter the CHS information for the drive, however, we no longer do that anymore because of a process called Autodetection. CMOS can still be used to configure the boot order and check for incorrectly jumpered drives.
Due to the magnetic nature of hard disks, they should remain clear of magnetic fields.
Once the drive has been installed it must be configured for use. In the old days of Windows 9x, we would use the DOS utility FDISK to create and format a partition to install Windows on. Newer operating systesm such as Windows 2000, 2003, XP, and Linux no longer rely on this step. These newer operating systems allow you to configure your partitions and formatting during the setup process after you run the bootable installation CD. There are also plenty of 3rd party tools such as Partition Magic that are popular for configuring disks to support multibooting among other things. Some additional disk configuration can be done after installation using a tool called Disk Management (Windows 2000, 2003, XP).
So the first thing we need to do is determine how we wish to partition our drive. In the old days, we had one type of disk formatting scheme called basic disks. Windows 2000, 2003, and XP Professional have added a new type called dynamic disks which is proprietary to Microsoft.
Basic Disk Partitioning:
The number of partitions you can create on a basic disk depends on the disk's partition style. On master boot record (MBR) disks, you can create up to four primary partitions, or you can create up to three primary partitions and one extended partition. Within the extended partition, you can create an unlimited number of logical drives. A primary partition of a basic disk is a portion of the physical disk that functions as though it were a physically separate disk. On most Intel based systems this partition is the one that is marked as active which allows the computer to start up. You can create up to four primary partitions (sometimes called volumes) on a single disk or three primary partitions and an extended partition with multiple logical drives.
Extended partitions allow you to create more than four individual volumes on a basic disk. Unlike primary partitions, you do not format an extended partition with a file system and then assign a drive letter to it. Instead, you create one or more logical drives within the extended partition. It's the logical drive of the extended partition that you format and assign a drive letter to. You can create an unlimited number of logical drives per disk.
If you are installing Linux, you will notice that it supports an addition partition type called Swap. The swap partition is used as virtual memory like Windows' page file.
Dynamic Disk Partitioning:
The Windows installation disk only allows you to configure basic disks. If you want to convert your basic disks to dynamic, you can do so by using the Disk Management snap-in or the DiskPart command line utility. When you convert a basic disk to dynamic, all existing basic volumes become dynamic volumes.
Dynamic disks provide features that basic disks do not, such as the ability to create volumes that span multiple disks (spanned and striped volumes), and the ability to create fault-tolerant volumes (mirrored and RAID-5 volumes). There are five types of dynamic volumes: simple (most common), spanned, striped, disk mirroring (RAID-1) and striping with parity (RAID-5). Mirrored and RAID-5 volumes are fault tolerant and are available only on computers running the Windows 2000 and 2003 Server family of operating systems.
Once the drive has been partitioned, it must then be formatted which is the last step before operating system installation. Windows has supported a few different file systems over the years as follows:
FAT - The file system during the early years of DOS.
FAT 16 - Available during the later years of DOS and Windows 95.
FAT 32 - Became available after the release of Windows 95 OSR2 and was the format of choice for Windows 98/ME. FAT 32 is still supported in current Windows operating systems, but rarely used.
NTFS - NTFS was released with the first version of Windows NT and is now the format of choice for Windows 2000, 2003, XP, and the new Vista. NTFS offers major improvements over its predecessors offering redundancy, compression, security, encryption, cluster sizing, and disk quotas.
As was mentioned before, the partitions and formatting of modern operating systems are configured during the installation from the bootable installation disk.
SCSI
SCSI stands for Small Computer Systems Interface and is a less commonly used, but faster alternative to IDE. Another advantage of SCSI is that only the controller uses an IRQ while the devices attached to it do not. SCSI devices are most commonly found in servers and high-end workstations.
SCSI devices, such as hard drives and CD-ROM drives, plug into a SCSI controller internally or externally, and multiple devices can be configured in a chain. Internal devices connect using a 68-pin ribbon cable that is similar to that used for IDE devices. It is very important that you get the pin orientation correct when installing a SCSI drive. Failure to do so can destroy the SCSI device and/or the SCSI controller card. External devices connect to the SCSI controller on the back of the PC. To learn more about the various cable and connector types, read SCSI Connector Types.
In order for the SCSI bus to work correctly, the last device on any SCSI chain must be terminated. Some SCSI devices are self-terminating, while others can be terminated using jumpers or a resistor that plugs into the end of the cable or device.
Each device on a SCSI chain must receive its own SCSI ID including the controller. This ID can be set on SCSI devices using either jumpers, dip switches or dials. You will need to consult with the manufacturer of your device to figure out the correct method for setting the ID. New SCSI standards support up to 16 devices. The controller is usually preset to receive ID 7. A bootable hard drive would usually be set to ID 0 since it is the lowest on the list and the first to be accessed.
SCSI controllers come with their own BIOS that offer configuration settings.
Over the years, there have been a number of SCSI standards and increasing speed. The table below shows the details of the various SCSI standards:
Floppy Drives
Floppy drives are also a form of magnetic storage that function similarly to hard drives. There is a spring loaded metal cover that is moved aside during operation that exposes a mylar disk that is coated with a ferro-magnetic substance. The drive's read/write heads access the disk as it turns on a spindle. Older PCs used 5.25 inch disks and drives that were able to hold 1.2mb of data. Modern 3.5 drives can hold 1.44mb of data. Given the popularity of newer storage types such as CDROM, ZIP disks and removable hard drives, it is not likely that further advancements to floppy technology will be made. In fact, many new computers are being built without them and it is probable that they will soon fade into oblivion.
The following procedure outlines the installation of a floppy drive.
Disconnect the power to the computer
Insert the drive into an available floppy drive bay
Screw in the 2 screws
Plug the floppy cable into the drive and into the mainboard FD1 interface while noting the pin 1 orientation. The floppy drive will not work if the FDD cable is plugged in backwards. Note the twist in the cable. Connecting the floppy to the last connector on the cable will make the drive an "A Drive" while plugging it in to the connector toward the middle of the cable will make it a "Drive B"
Connect one of the power supply's power connectors to the drive
If you are having problems reading a floppy disk, it is best to first check the disk. If it still will not read, you should try other disks to see if they work. Floppy disks do not last forever and can go bad just sitting around for long periods of time. If no disks will work in the drive, then you should check the cabling and make sure that everything is connected properly. Next, try a different floppy drive. They are very inexpensive and it might be worth installing a new one, or taking one from another computer for testing purposes. If the new drive does not work, then the most likely suspect is your FDD controller. If this is the case, you can purchase an external USB floppy drive, or buy an internal FDD controller card and install it in an available PCI slot.
CD-ROM Drives
In addition to being able to play CD-audio disks, a CD-ROM drive can read data disks, and those with the CD-R or CD-RW designation can also record on CD media (more on this below). Here is how a CD-ROM works. A beam is emitted by the laser and directed onto a single track on the disc by a prism/beamsplitter. As the disc rotates, the beam encounters a series of pits and landings that determine whether the beam is reflected back into the detector(from a landing) or scattered(from a pit). Light from the laser beam must penetrate a thin protective layer of plastic on the disc before striking the reflective coating that contains the pits and landings. As the disc rotates, light reflected from landings on the disk strikes the photo sensor producing a series of electrical pulses that are coordinated with a timing circuit to generate a stream of 1s and 0s that produce the binary code of information on the disc. The average storage capacity for a CD-ROM is 680mb of data. CD-ROM speeds are listed as AxBxCx (i.e. 24x8x32x) where A is the write speed, B is the rewrite speed, and C is the read speed.
Most current CD-ROM drives have the capability to record data. There are 2 main types of CD recorders.
CD-R (Recordable) - Uses a chemical layer with a thin metal layer(silver alloy or gold). Burning removes reflective parts to simulate pits and lands and represent 1s and 0s. CD-R media comes in 74 minute 650MB capacity and 80 minute 700MB capacity versions.
CD-RW (ReWritable) - CD-RW media can be rewritten multiple times whereas CD-R can only be burned once. CD-RW uses phase-change material that crystallizes to write, and rewrite CDs through a heating and cooling process. You can only record on CD-RW media if the CD-ROM drive supports it.
A common application for CD-ROM drives is burn MP3 files onto a CD. Let's say that you want to make a music mix from a bunch of CDs that you have purchased. First, you would need to rip the songs from CDA format to MP3 (some burning software includes this capability). After this is complete, you can burn your ripped MP3s onto a CD and play them in any CD player that supports the MP3 format.
To burn a CD you will use software such as Roxio's Direct CD or Nero. Burning software will give you the choice of creating a audio CD which will play in your stereo, or a data CD which can only be read by CD-ROM drives.
The following procedure outlines the installation of a CDROM drive.
Disconnect the power to the computer
Configure the appropriate master/slave settings or SCSI ID for the drive
Insert the drive into an available drive bay
Screw in the 4 screws - 2 on each side of the bay
If the drive is an IDE, connect the IDE cable to the drive. There should be a stripe along 1 edge of the cable. This stripe denotes pin 1. Pin 1 on the drive is usually closest to the power connector on the drive, however, you should consult the manufacturers documentation. Then connect the signal cable to the motherboard ID1 or ID2 interface making sure to note the pin 1 orientation there as well. If the drive is a SCSI drive, a SCSI cable would be connected from the drive to a SCSI controller card.
Connect one of the power supply's power connectors to the drive.
DVD Drives
DVDs have nearly replaced VHS players in a relatively short amount of time. The reason for this is their incredible capacity for storing data and improved picture quality. Another major advantage is that DVD players became available for computers which did not happen with the VHS (can you imagine?). DVDs come in single-sided and dual-sided formats and can store 2 hours of video per side using the MPEG-2 compression standard. Because DVDs are compressed, they need to be decoded as they play. On a computer this can be done with the use of software or a hardware decoder. Hardware decoders use less CPU time.
DVD-ROM drives are the most common type of DVD drives sold for computers. DVD-ROM discs can hold up to 16 GB of data, however, there are 2 newer technologies that are fighting for supremacy - HD DVD and Blu-ray. HD DVD was developed by Microsoft and offers media that can store 30GB of data. Blu-ray was developed by Sony and can hold 50GB of data. There won't likely be anything on the A+ exams about these 2 technologies, but it is probably good to know they exist.
Just like CD-ROM players, DVD-ROM drives offer recordable versions. DVD-R and DVD+R can be recorded on once only. DVD-RW, DVD+RW and DVD-RAM are rewriteable. DVD drives can play CD-ROMs and all DVD writable drives can burn CDs as well. DVD players connect to the PC in the same way that CD-ROM drives do using either an ATAPI or SCSI interface.
One of the biggest problems with DVD-ROM technology is compatibility because of all of the different media types. A while back, if your friend gave you a burned DVD-RW, you wouldn't be able to edit it with your DVD+RW drive. In fact, you might not even be able to PLAY it on your drive. This has been addressed to some degree with the release of DVD±RW combo drives which can record on just about anything. The next problem is finding out if the DVD you burned will play on the DVD player in your home entertainment system and you will have to check the specs on yours to see what formats it supports.
Another problem with DVD media that can cause headaches is the fact that some media, particularly the cheap stuff, just doesn't work well (or at all) in certain drives. If you find media that works, it is best to stick with it. If you are having problems, make sure you have media that your DVD-ROM drive supports and try a higher quality to see if that helps.
When working with CD-ROM and DVD-ROM burners, one of the most common problems is buffer underruns. Burners come with buffer RAM onboard that temporarily stores the data coming from the source. There are many causes for buffer underrun errors, but following are the most common things that will fix this.
Make sure that your burner has a large enough buffer.
Make sure that you close as many applications and processes on your computer before burning. Also make sure that screen savers, anti-virus software, etc. do not start running while you are burning.
Try burning at a slower speed.
Make sure that your media is not scratched or dirty.
Tape Drives
Tape drives appear to be fading away so you might not see anything related to this section on the exam. With advances in digital and optical storage technologies as well as advancements in Windows' backup capabilities (e.g. back up to network storage), this technology is becoming obselete.
Tape drives are another form of magnetic storage media that functions similarly to the other types. The tape is belt driven and read/write heads magnetize portions of the tape as it passes by them. Tape drives are typically used for backing up and storing data. Because they are comparatively slow, they are used to store data that does not need to be accessed very often. Older versions of tape drives were quarter-inch cartridges(QIC) that were approximately 6" x 4" in size. Improvements in encoding enabled advancements in the amount of data that could be stored on these tapes.
The newest advancements in tape technology (which aren't very recent) have brought about Digital Audio Tape(DAT) and Digital Linear Tape(DLT). DAT tapes work in a similar fashion as a VCR tape and can store much larger amounts of data than the QIC formats. There are several different DAT standards as follows:
Standard
Compressed capacity
Uncompressed capacity
DDS-1
4 GB
2 GB
DDS-2
8 GB
4 GB
DDS-3
24 GB
12 GB
Tape Drives are typically connected to Parallel or SCSI ports.
Flash Drives and Flash Cards Also known as thumb drives, USB flash drives offer advantages over other portable storage devices and are partially responsible for the disappearance of floppy and ZIP disk technologies. They are more compact, generally faster, hold more data, and are more reliable due to both their lack of moving parts (solid state), and their more durable design. These types of drives use the USB mass storage standard, and therefore, can be used with Linux, Mac OS X, Unix, and Windows. The drive is simply plugged into the computer's USB port and it registers as removable storage in My Computer (Windows). Newer computer systems will also allow these drives to be selected as the boot device which can be useful for storing certain utilities and troubleshooting tools. In Windows Vista, the ReadyBoost feature allows use of a flash drive to supplement system memory. At the time of this writing there are flash drives with a storage capacity of up to 64 gigabytes.
Another type of removable storage is flash cards which come in several different varieties and are used with portable devices such as digital cameras, cell phones, and PDAs.
CompactFlash is the oldest and largest of the flash card types and is based on a simplified PCMCIA bus. CF cards come in CF I and CF II sizes, the latter being thicker. Like all other flash cards, the CompactFlash cards are solid state, although some manufacturers have turned this form factor into microdrives which are minature hard drives. These drives have platters and heads just like a regular hard drive. The two types look identical, however, microdrives can use too much power for some devices, but are less expensive.
Secure Digital (SD) cards are the most commonly used format today after displacing a similar type by SmartMedia. SD cards come in 2 types: SD and SDIO. Both are identical looking so you need to check with the manual or manufacturer of your device to find which to use. SD cards are smaller than CompactFlash, but come in 2 even smaller sizes: MiniSD and MicroSD are smaller versions that are commonly used in cell phones.
There are other types of flash media such as memory sticks which are a proprietary flash card used by Sony and xD picture cards which was developed by Olympus and is used in digital cameras.
For popular formats such as SD cards and CompactFlash, there are USB cardreaders available that can be attached a computer. Some printers, home entertainment systems, and computers come with card readers built in.

 Hard drives are magnetic storage devices that contain several discs inside called "Platters" that are attached to a spindle motor. The number of platters varies depending on the capacity of the drive. Platters are coated with a film of magnetically sensitive substance that is primarily made of iron oxide. Another important ingredient is a thin layer of cobalt alloy. The read/write heads are responsible for reading and writing to the platters and are attached to the head actuator which is in charge of moving the heads around the platters.

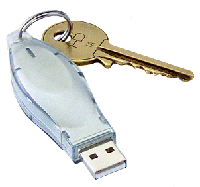 Also known as thumb drives, USB flash drives offer advantages over other portable storage devices and are partially responsible for the disappearance of floppy and ZIP disk technologies. They are more compact, generally faster, hold more data, and are more reliable due to both their lack of moving parts (solid state), and their more durable design. These types of drives use the USB mass storage standard, and therefore, can be used with Linux, Mac OS X, Unix, and Windows. The drive is simply plugged into the computer's USB port and it registers as removable storage in My Computer (Windows). Newer computer systems will also allow these drives to be selected as the boot device which can be useful for storing certain utilities and troubleshooting tools. In Windows Vista, the ReadyBoost feature allows use of a flash drive to supplement system memory. At the time of this writing there are flash drives with a storage capacity of up to 64 gigabytes.
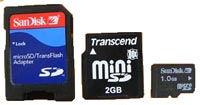 Secure Digital (SD) cards are the most commonly used format today after displacing a similar type by SmartMedia. SD cards come in 2 types: SD and SDIO. Both are identical looking so you need to check with the manual or manufacturer of your device to find which to use. SD cards are smaller than CompactFlash, but come in 2 even smaller sizes: MiniSD and MicroSD are smaller versions that are commonly used in cell phones.

